Simple Accounts | User Manual
1. Introduction to Simple Accounts (SAC)
Simple Accounts (SAC) is a streamlined accounting software designed to simplify financial management for small to medium-sized businesses. This manual provides a comprehensive guide to setting up and operating SAC effectively.
2. Initial Setup
Before starting daily operations, several foundational elements must be configured in SAC. This one-time setup ensures all subsequent financial transactions are accurately categorized and recorded.
2.1. Create Users
Users are the individuals who will access and operate the software.
Managing user access and permissions is critical for security and internal controls.
Setup → User
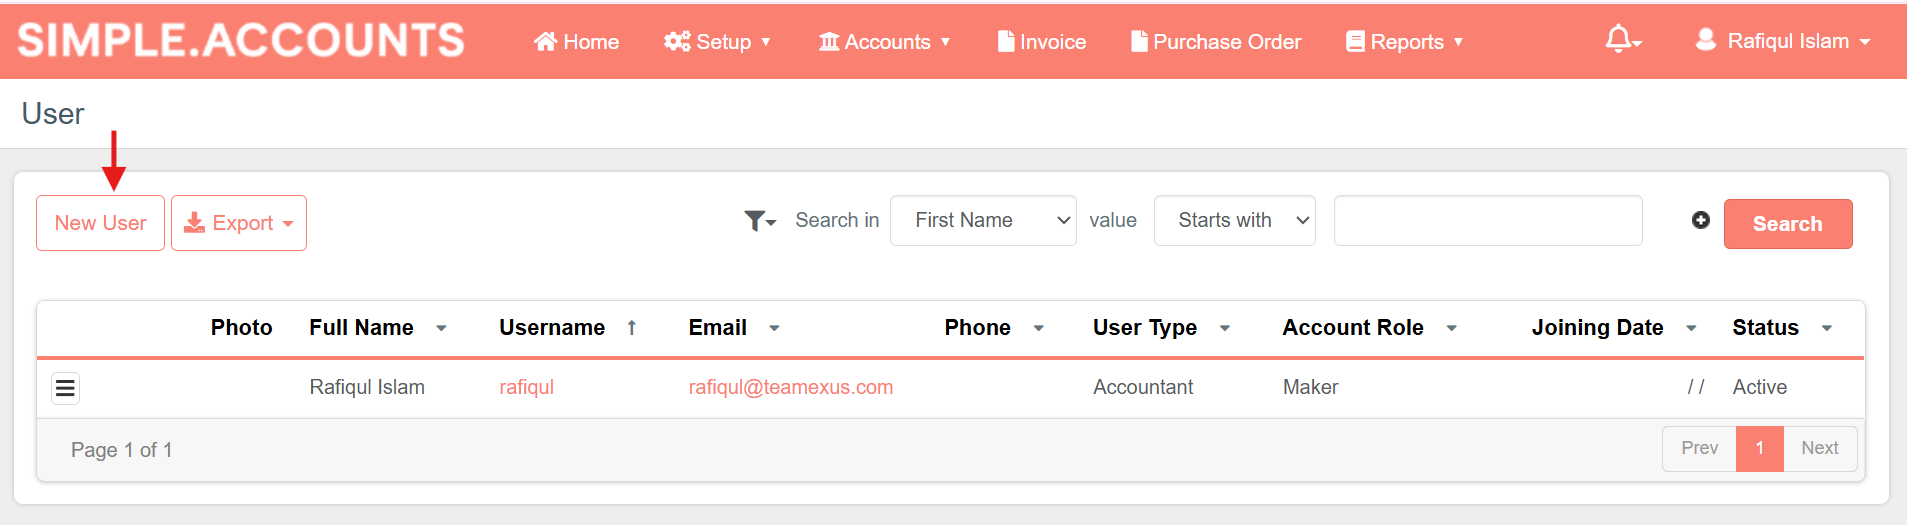
Create New User
- Go to ‘New User’
- Enter User Details (User Name, Email, Phone, etc) and specify user roles (User Type, Account Role, Status).
- Press the ‘Confirm’ button.
2.2. Create Branch
If your organization operates across multiple locations, define them here.
Setup → Branch
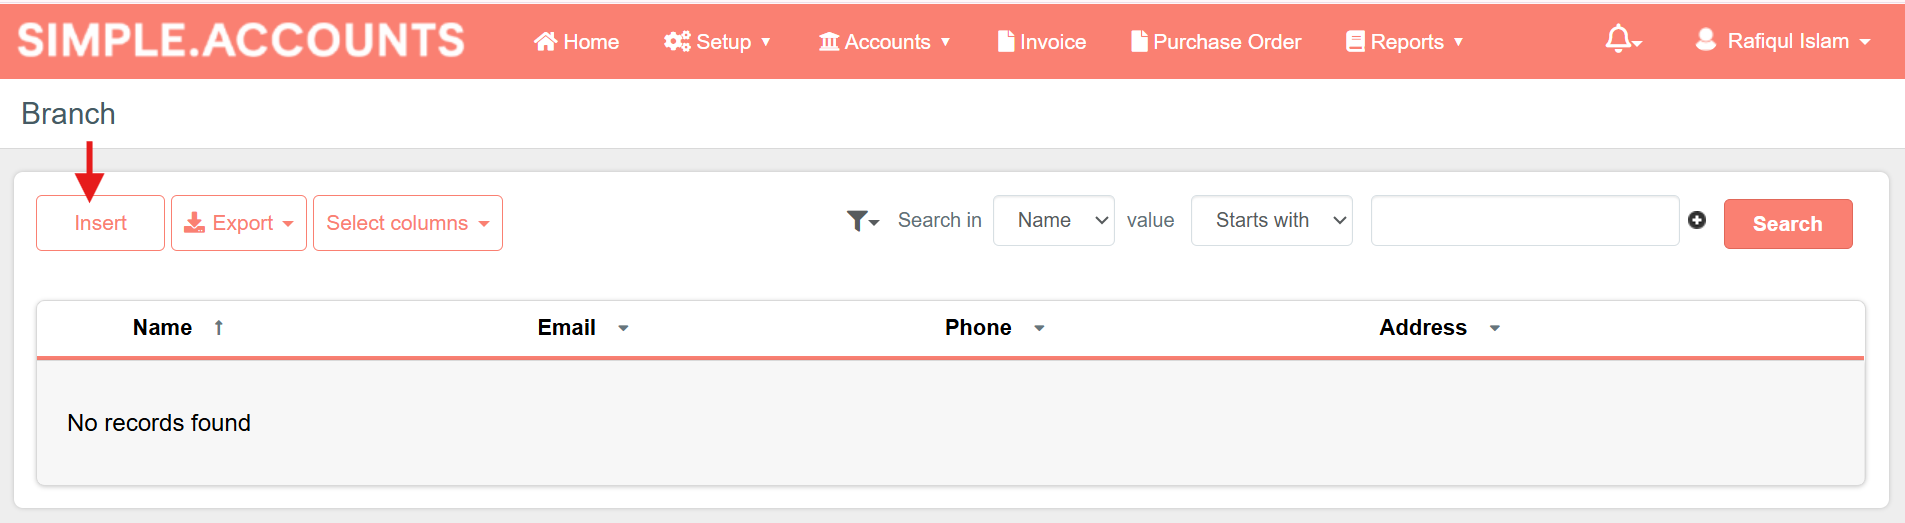
Create New Branch
- Go to ‘New Branch’
- Enter General Information (Name, Email, Phone, Address).
- Specify the branch managers. (Note: Branch managers must be added as a user first.)
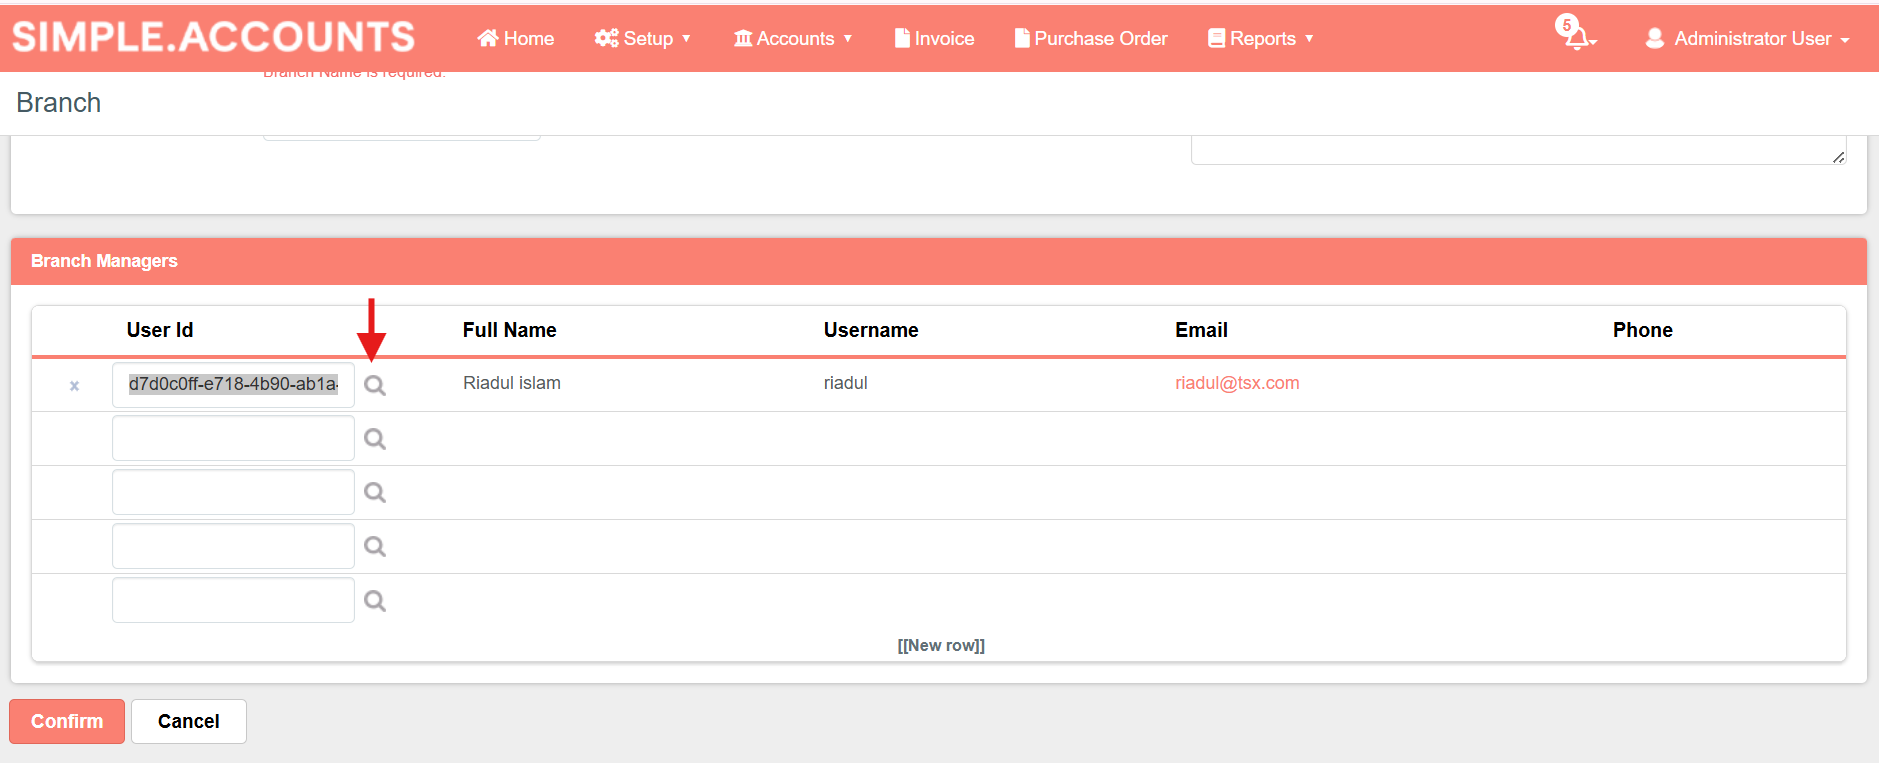
- Press the ‘Confirm’ button.
2.3. Create Currency
This software supports multi-currency transactions.
Setup → Currency
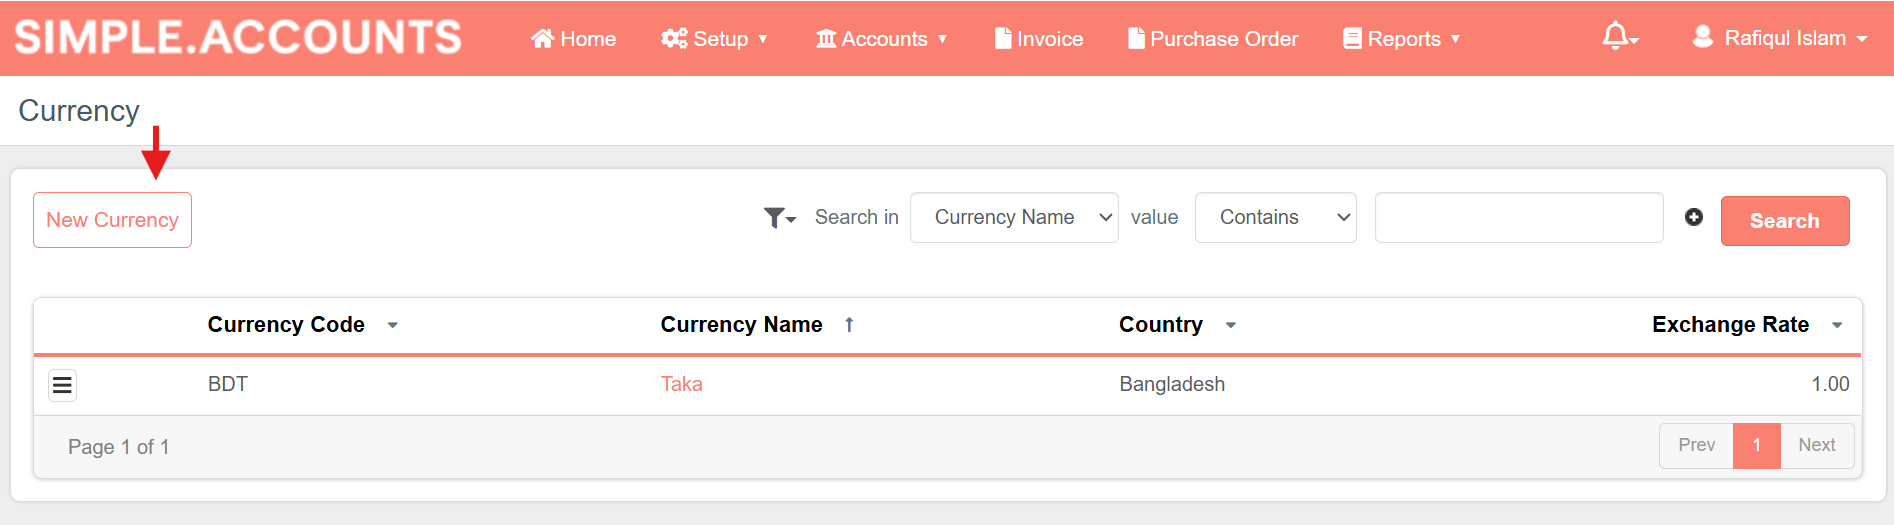
Create New Branch
- Go to ‘New Currency’
- Enter General Information (Currency Code, Currency name, Country, Exchange rate).
- Press the ‘Confirm’ button.
2.4. Create Account
Accounts will be used for recording financial transactions such as incomes, expenses.
Setup → Accounts
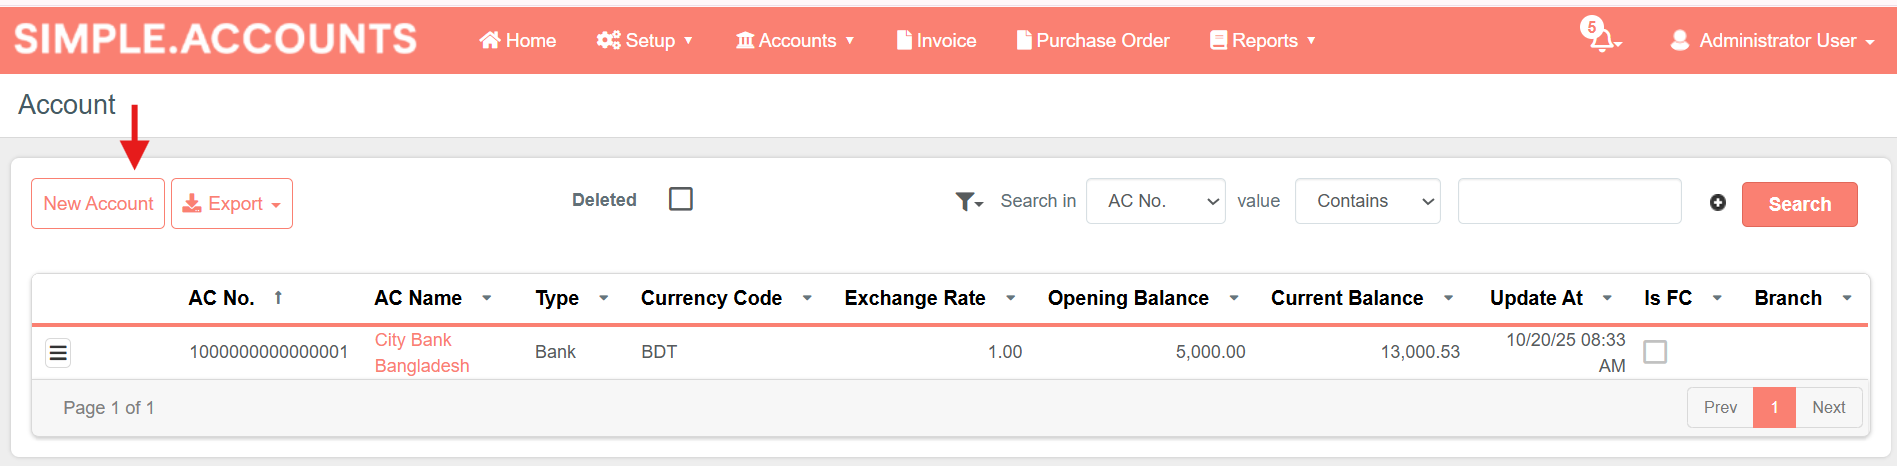
Create New Account
- Go to ‘New Account’
- Enter General Information (AC no., Account name, Type, Is FC, elc).
- Select a branch if the account is associated only with a branch. If you select a branch then the account will only be accessible only by that branch managers.
- Select ‘Is FC’ if the account is foreign currency.
- Select the currency associated with the account. 2.3. Create Currency
- Press the ‘Confirm’ button.
2.5. Create Expense Head
The Expense Head feature allows to define and categorize different types of business expenses. Creating expense heads helps in organizing financial records, making it easier to track and analyze where money is being spent.
Setup → Expense Head
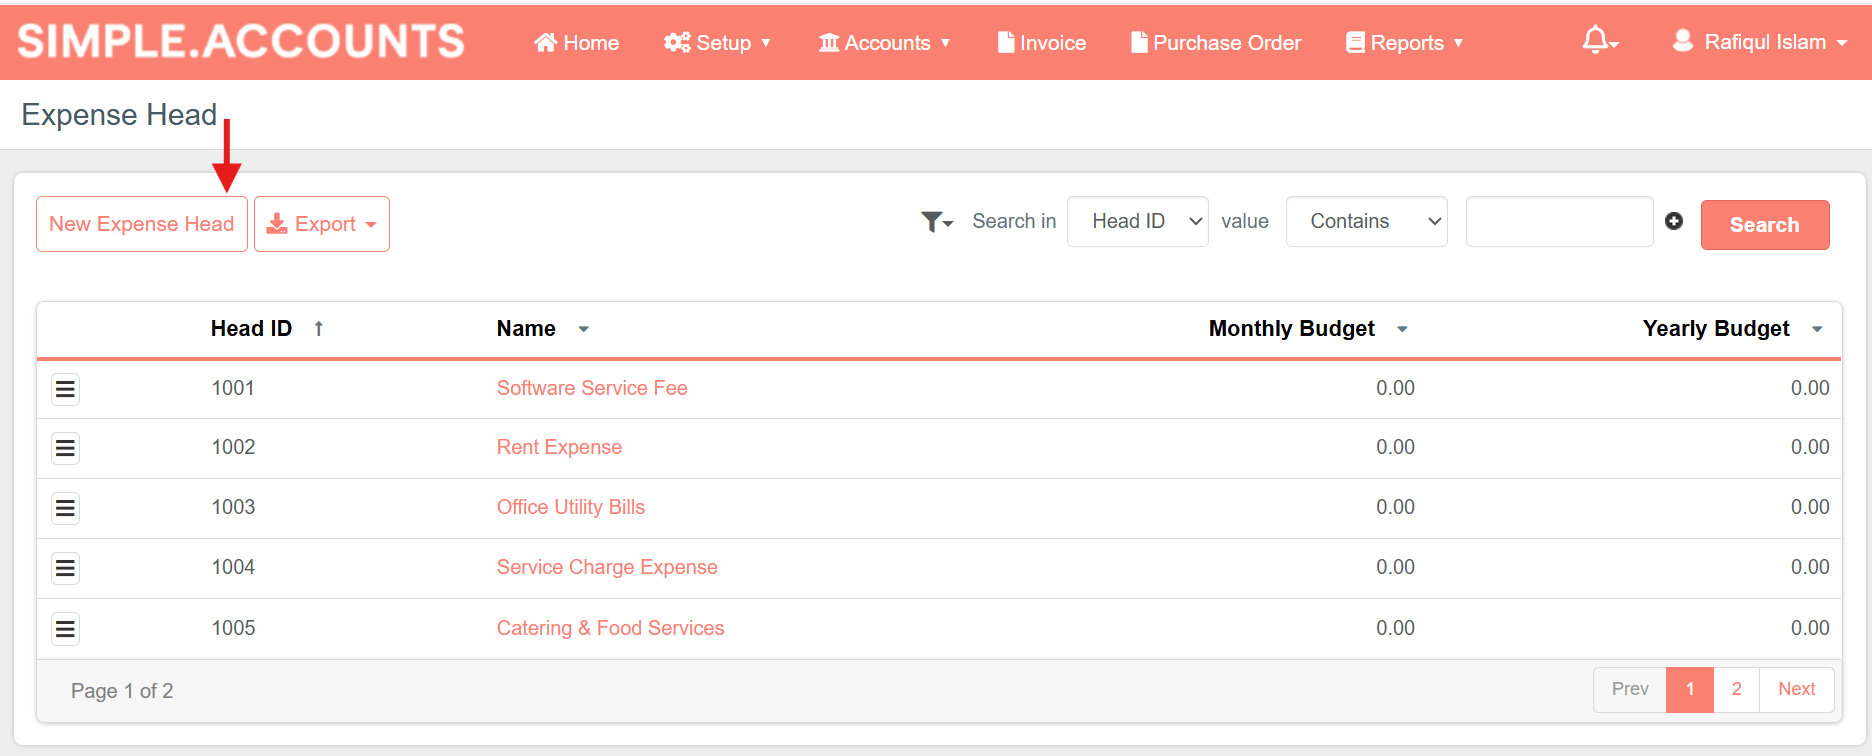
Create New Head
- Go to ‘New Expense Head’
- Enter General Information (Head ID, Name, Monthly Budget, Yearly Budget).
- Press the ‘Confirm’ button.
2.6. Create Clients
The Clients feature allows us to manage customer information efficiently. This helps in maintaining accurate customer data for invoicing, payments, and reporting.
Setup → Clients
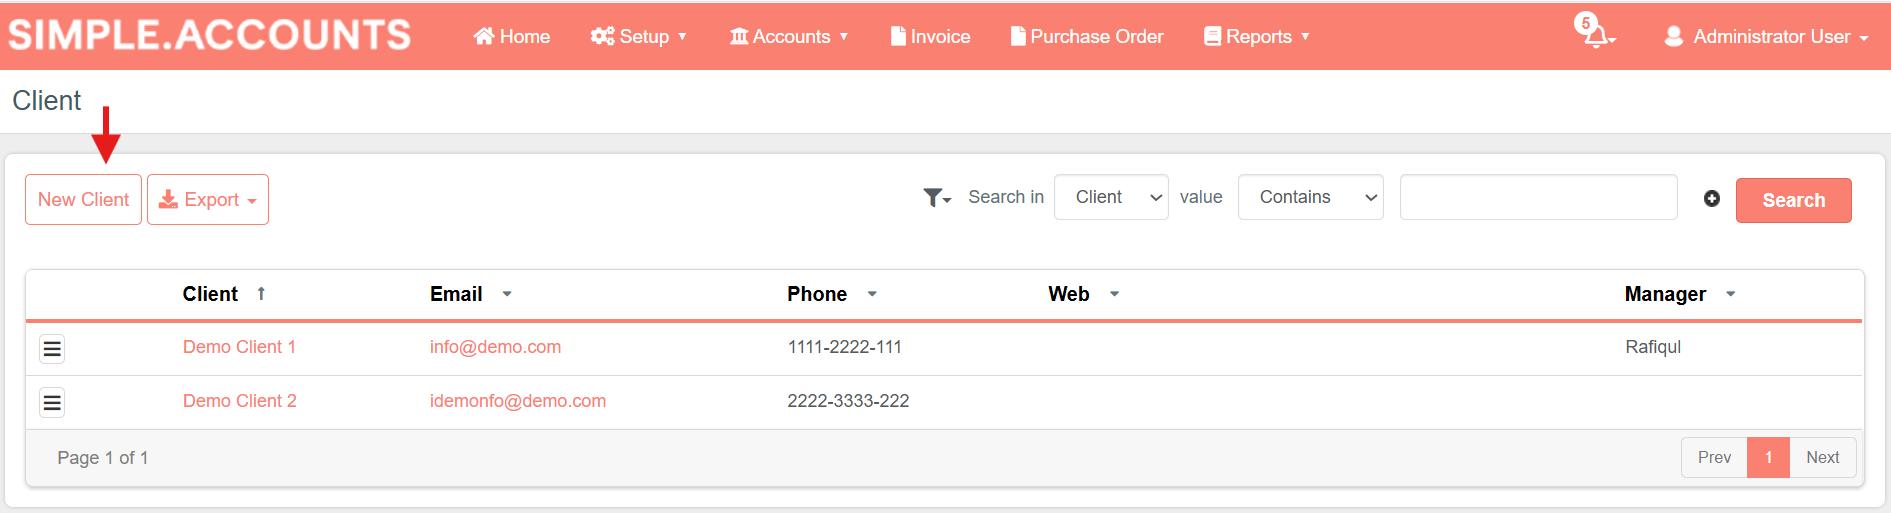
Create New Client
- Go to ‘New Client’
- Enter General Information (Name, Email, Phone, etc).
- Press the ‘Confirm’ button.
2.7. Create Suppliers
The supplier feature allows it to help in maintaining accurate records for purchases and payments.
Setup → Suppliers
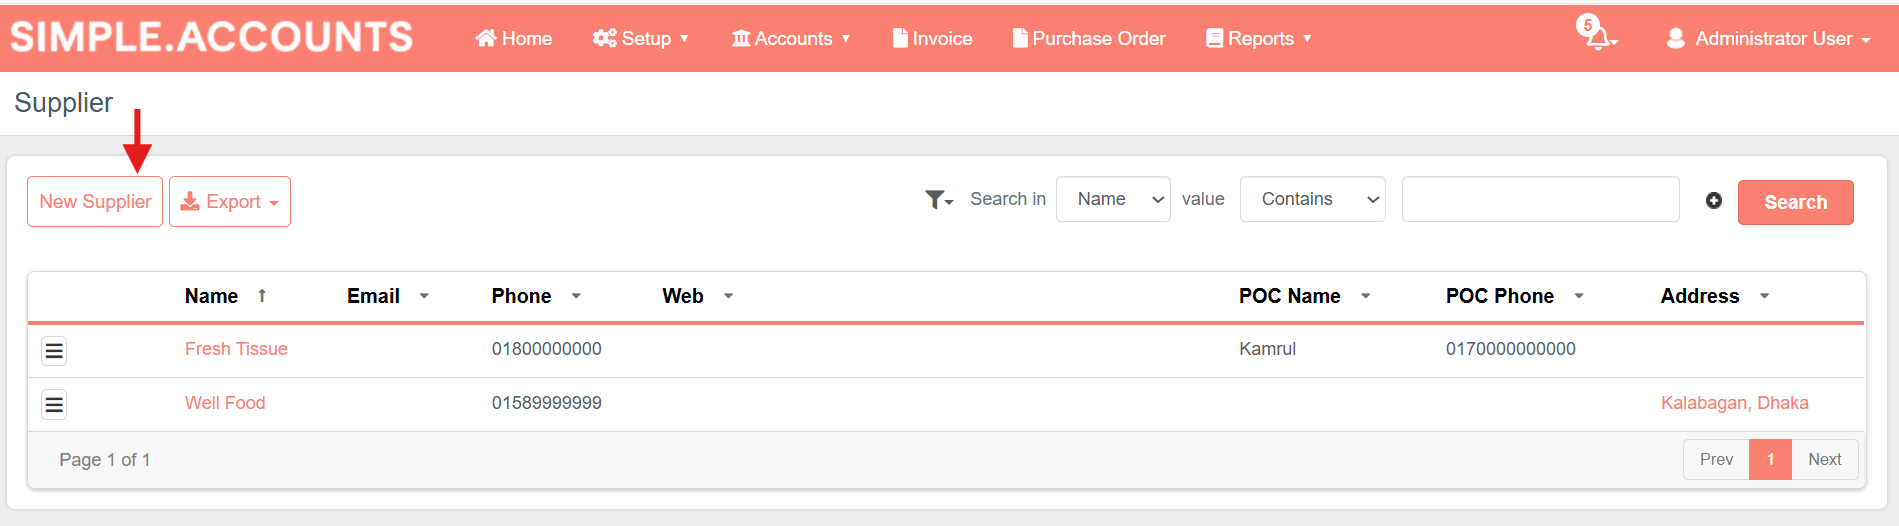
Create New Supplier
- Go to ‘New Supplier’
- Enter General Information (Name, Email, Phone, etc).
- Press the ‘Confirm’ button.
2.8. Create Service Code
The Service Code feature allows to define and manage different types of services and it contains the VAT and TAX rate.
Setup → Service codes
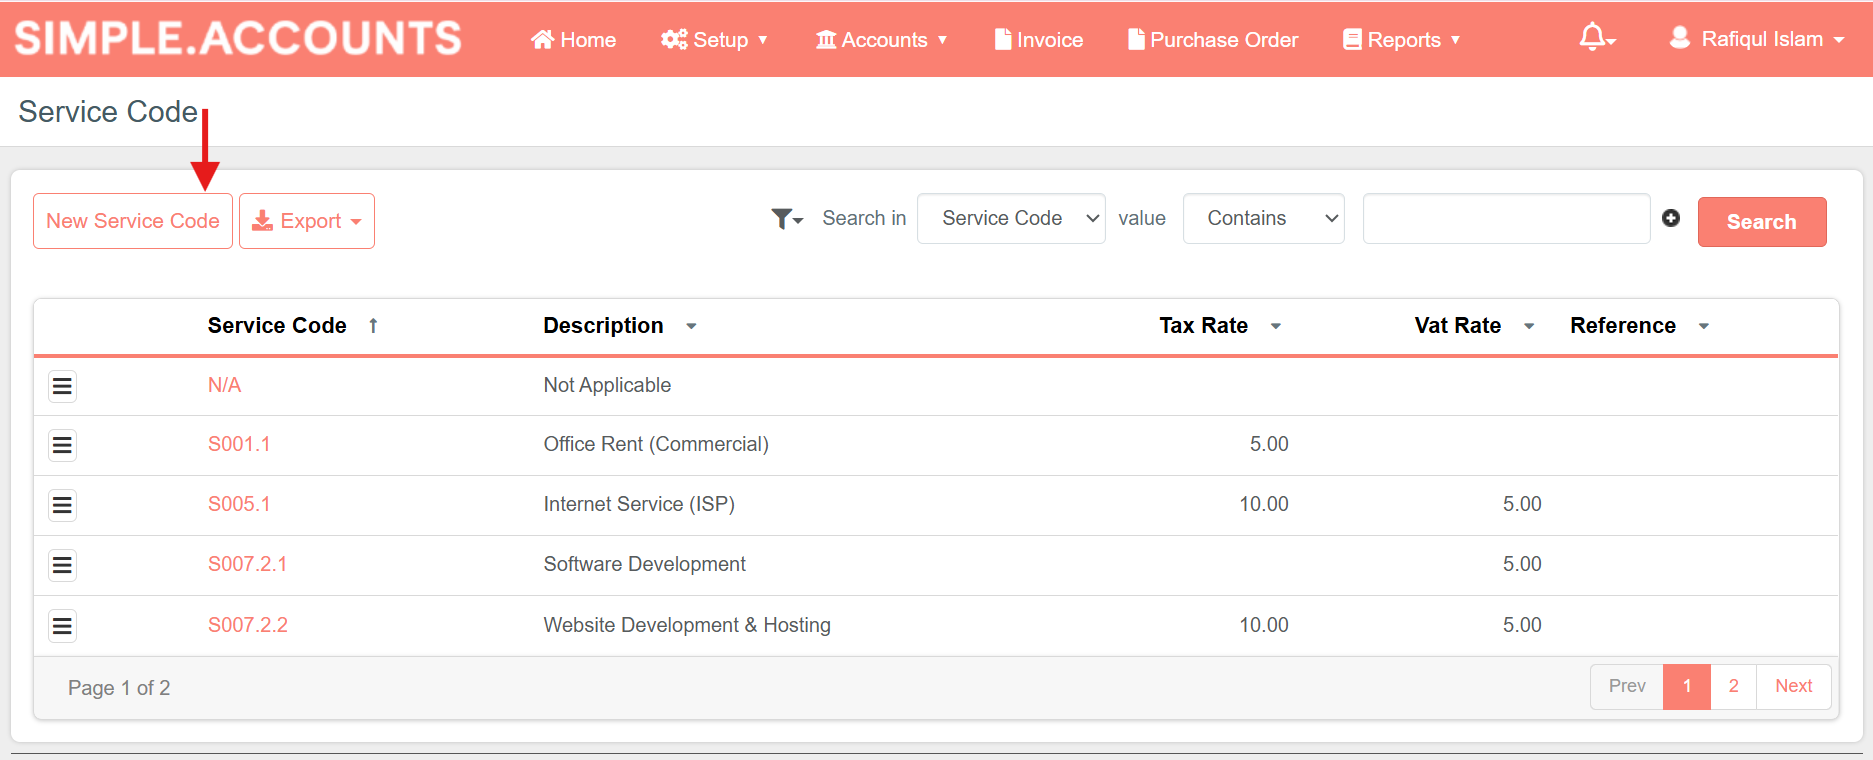
Create New Service Code
- Go to ‘New Service Code’
- Enter General Information (Code, Description, Tax Rate, Vat Rate, etc).
- Press the ‘Confirm’ button.
2.9. Create Batch Process
The Batch Process feature allows us to pay multiple VAT or Tax records at once as a single grouped transaction. This helps streamline payment processing and ensures that multiple tax liabilities can be cleared efficiently using the same payment reference.
Accounts → Batch Process
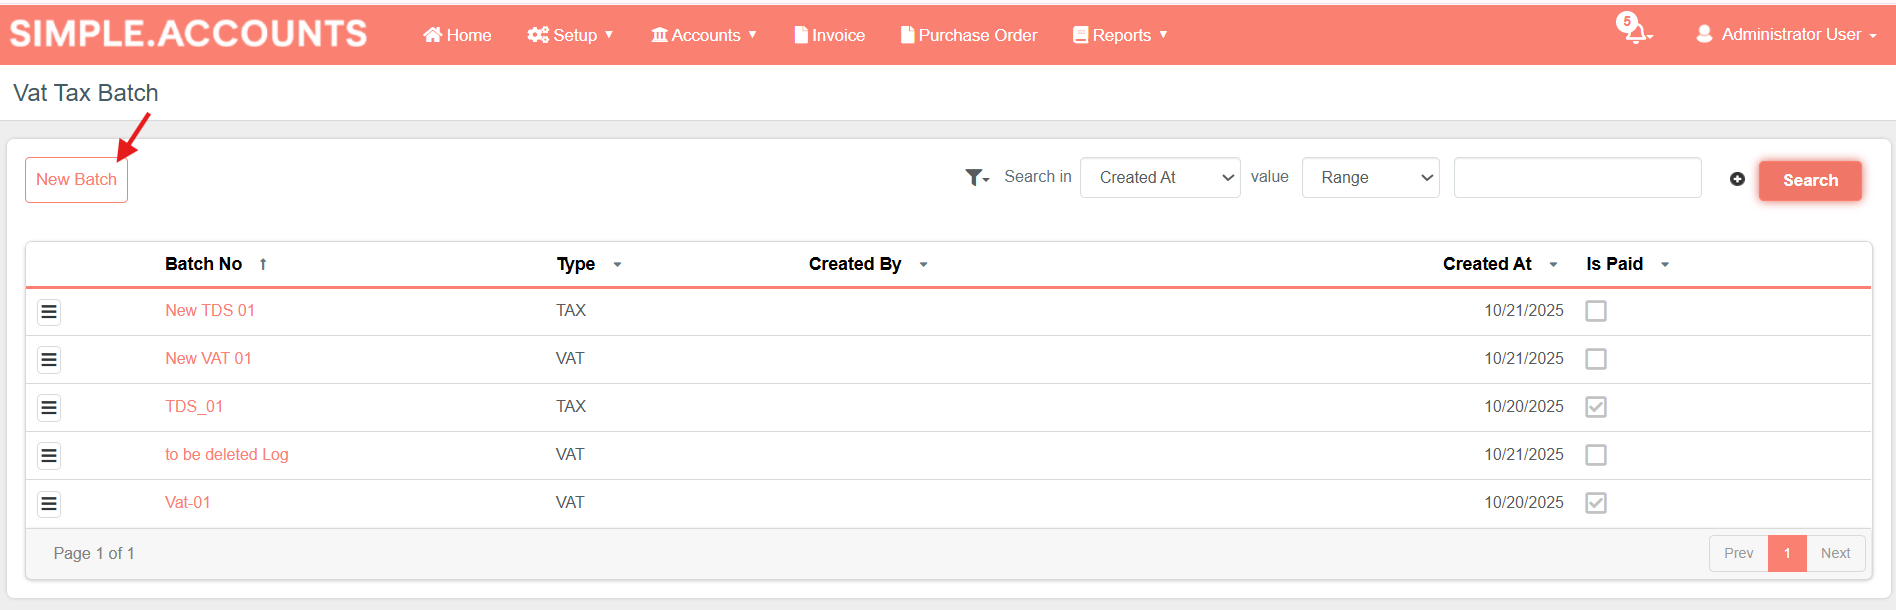
Create New Batch
- Go to ‘New Batch’
- Select the Batch type (Vat or Tax).
- Enter Batch no.
- Press the ‘Confirm’ button.
3. Operations
Once the setup is complete, you can begin daily operational tasks.
3.1. Create Invoice
The Invoice feature allows users to create and manage sales invoices for clients. It records details of goods or services sold, including quantities, prices, taxes, and payment terms. This feature ensures accurate billing, income tracking, and financial reporting.
Invoice
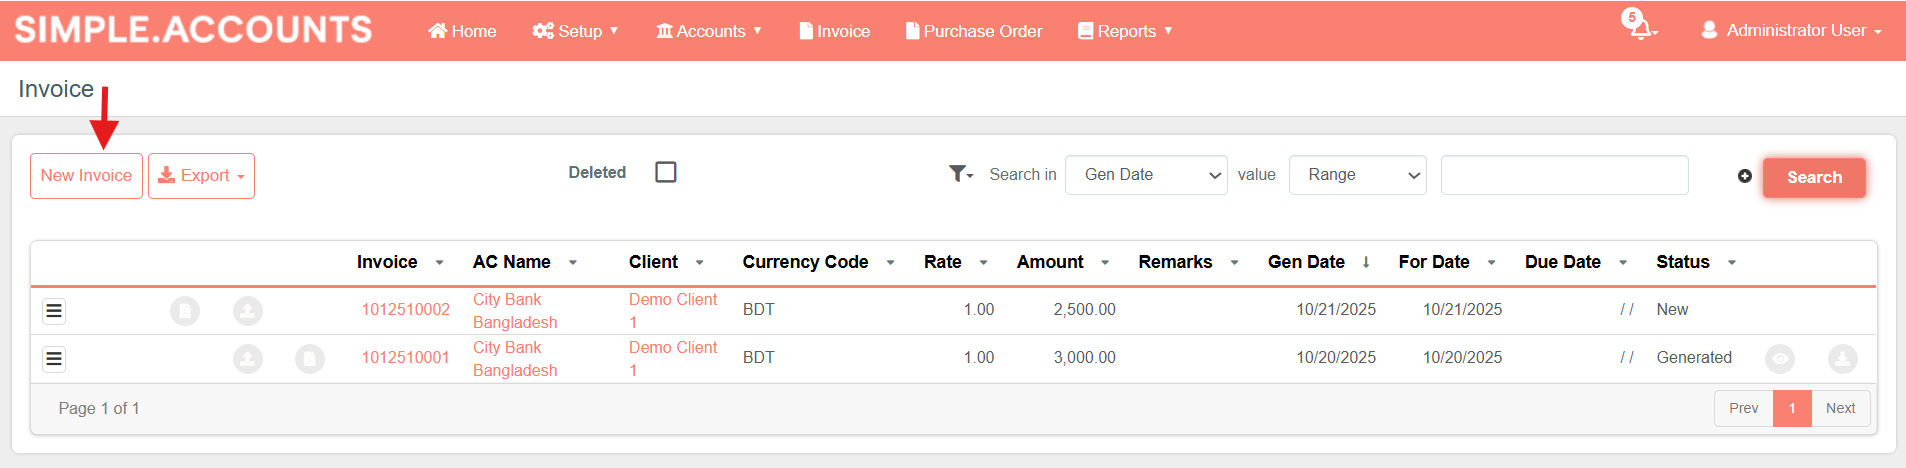
- Here, the invoice number is a 10 digit number. The first 3 digits stands for client ID, next 2 digit stands for Year, next 2 digit stands for Month, and the last 3 digits represent the serial number.
Create New Invoice
- Go to ‘New Invoice’
- Enter General Information (For Date, Due Date, Remarks, etc).
- Select the client for whom you are creating the invoice. 2.6. Create Clients
- Select the Account where the payment will come. 2.4. Create Account
- Select the Service Code which is related to the service. The Vat rate and Tax rate will come from the service code. 2.8. Create Service Code
- Enter the service/product details (Description, Quantity, Unit Price).
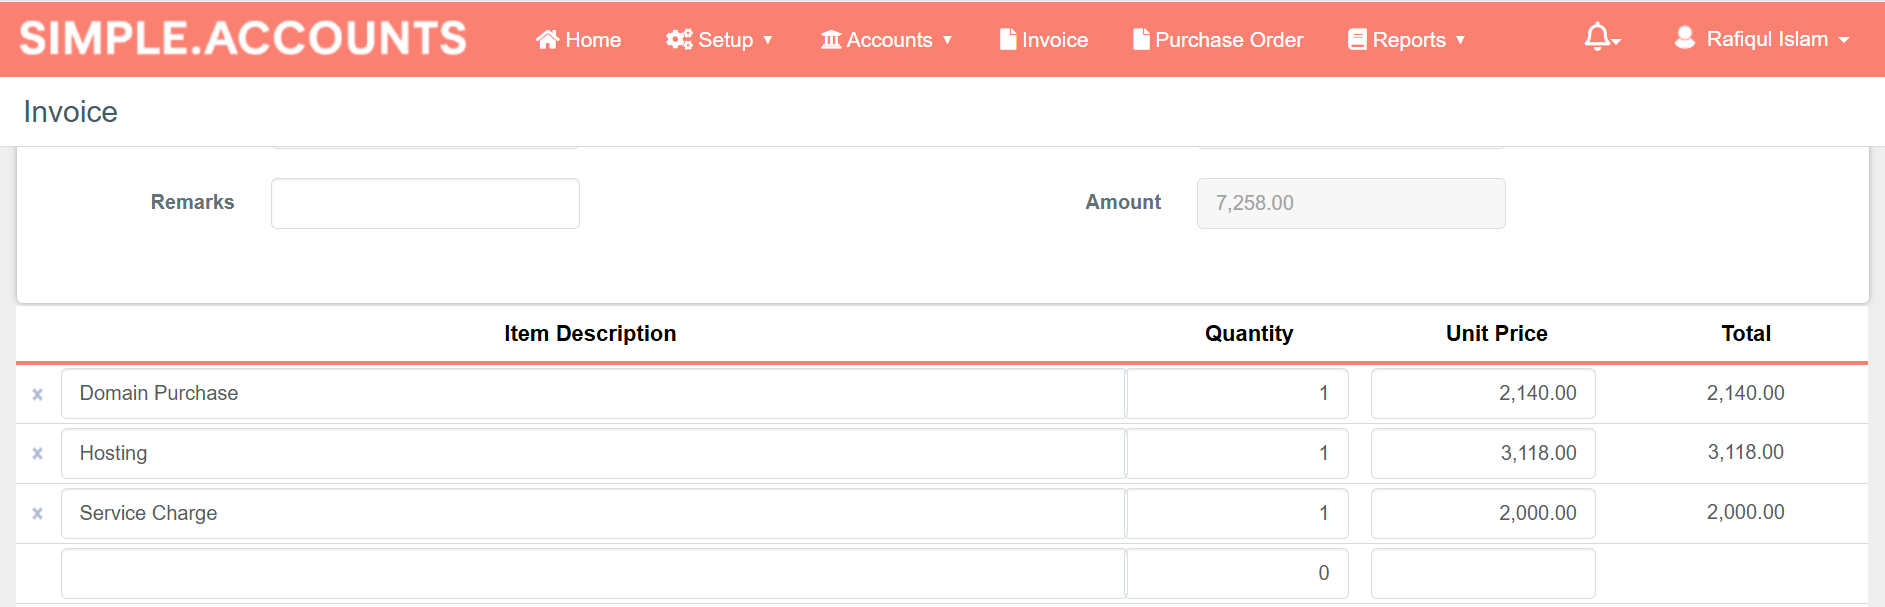
- Press the ‘Confirm’ button.
3.2. Create Income
The Income feature allows to record and manage all income transactions received by the business.
Accounts → Income
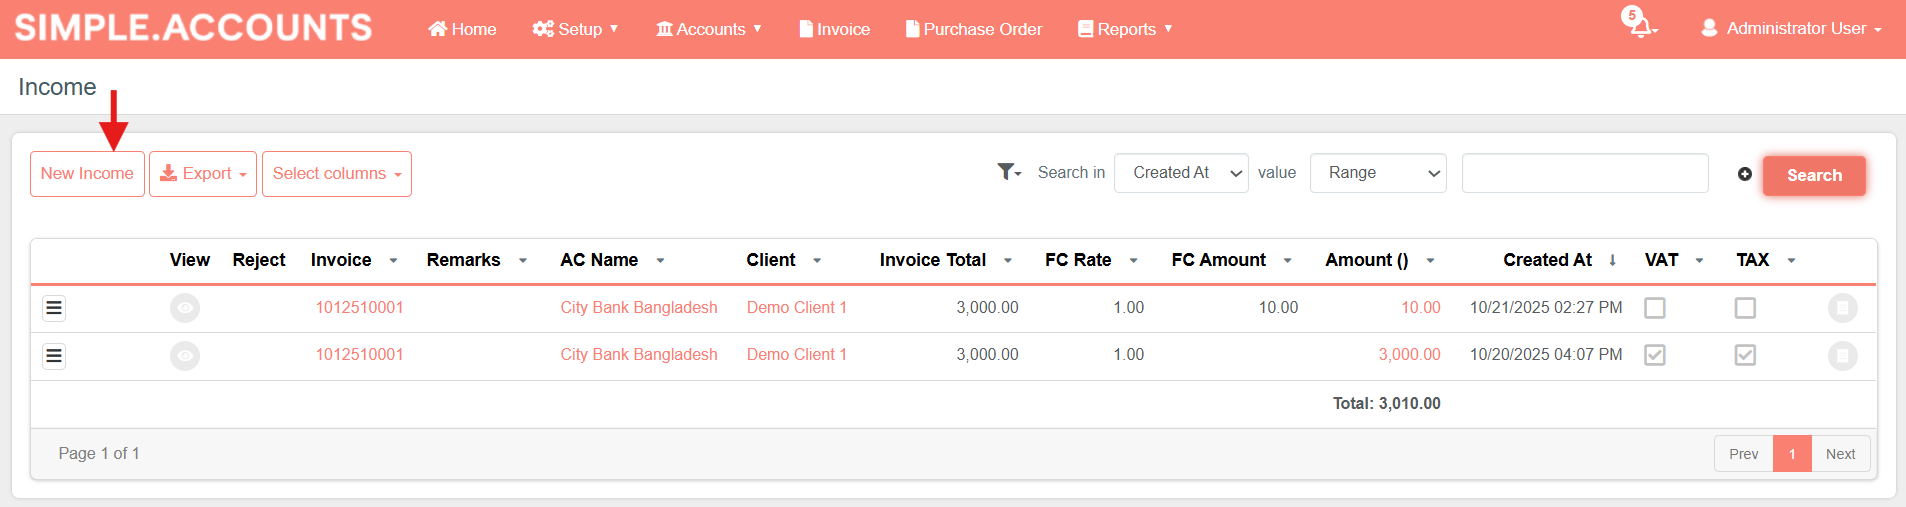
Create New Income
- Go to ‘New Income’
- Select the Invoice. 3.1. Create Invoice
- Enter the Income Amount.
- Mark if the Vat or Tax is Inclusive.
- Press the ‘Confirm’ button.
3.3. Create Purchase Order
A purchase order serves as an official document confirming the details of items or services the business intends to buy — including quantities, prices, and terms. This ensures clear communication with suppliers and accurate tracking of purchases.
Purchase Order
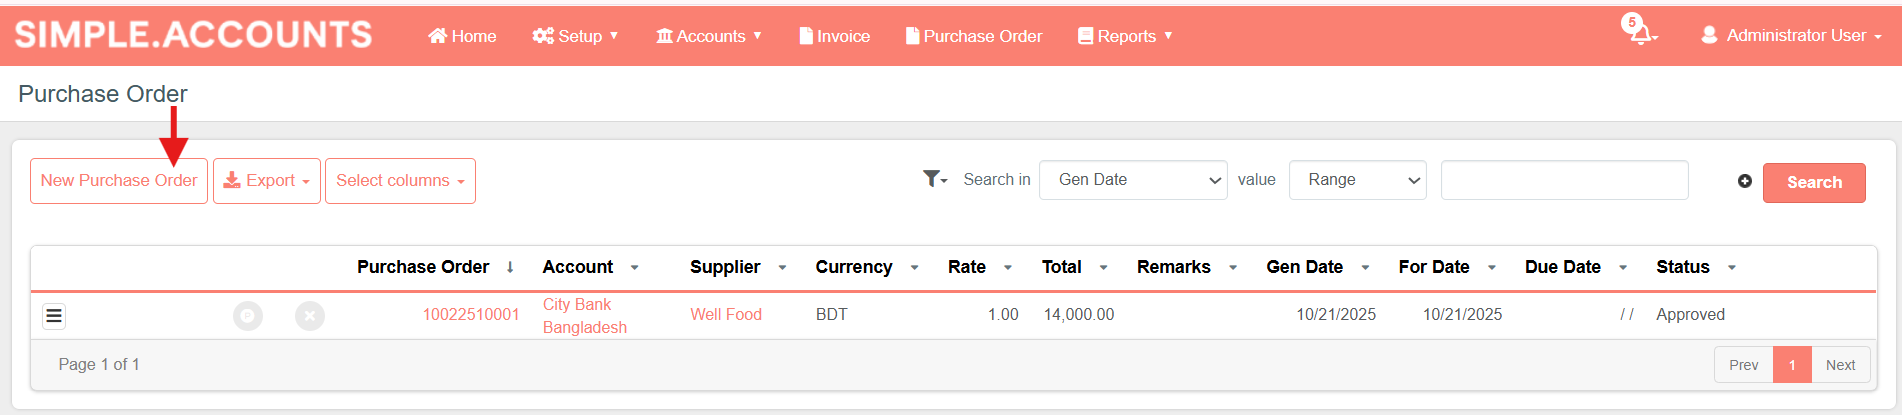
- Here, the Purchase Order number is a 11 digit number. The first 4 digits stand for Supplier ID, next 2 digit stands for Year, next 2 digit stands for Month, and the last 3 digits represent the serial number.
Create New Purchase Order
- Go to ‘New Purchase Order’
- Enter General Information (For Date, Due Date, Remarks, etc)
- Select the supplier you’re purchasing from. 2.7. Create Suppliers
- Select the account from which you will make the payment. 2.4. Create Account
- Select the Service Code which is related to the service. The Vat rate and Tax rate will come from the service code. 2.8. Create Service Code
- Enter the service/product details (Description, Quantity, Unit Price).
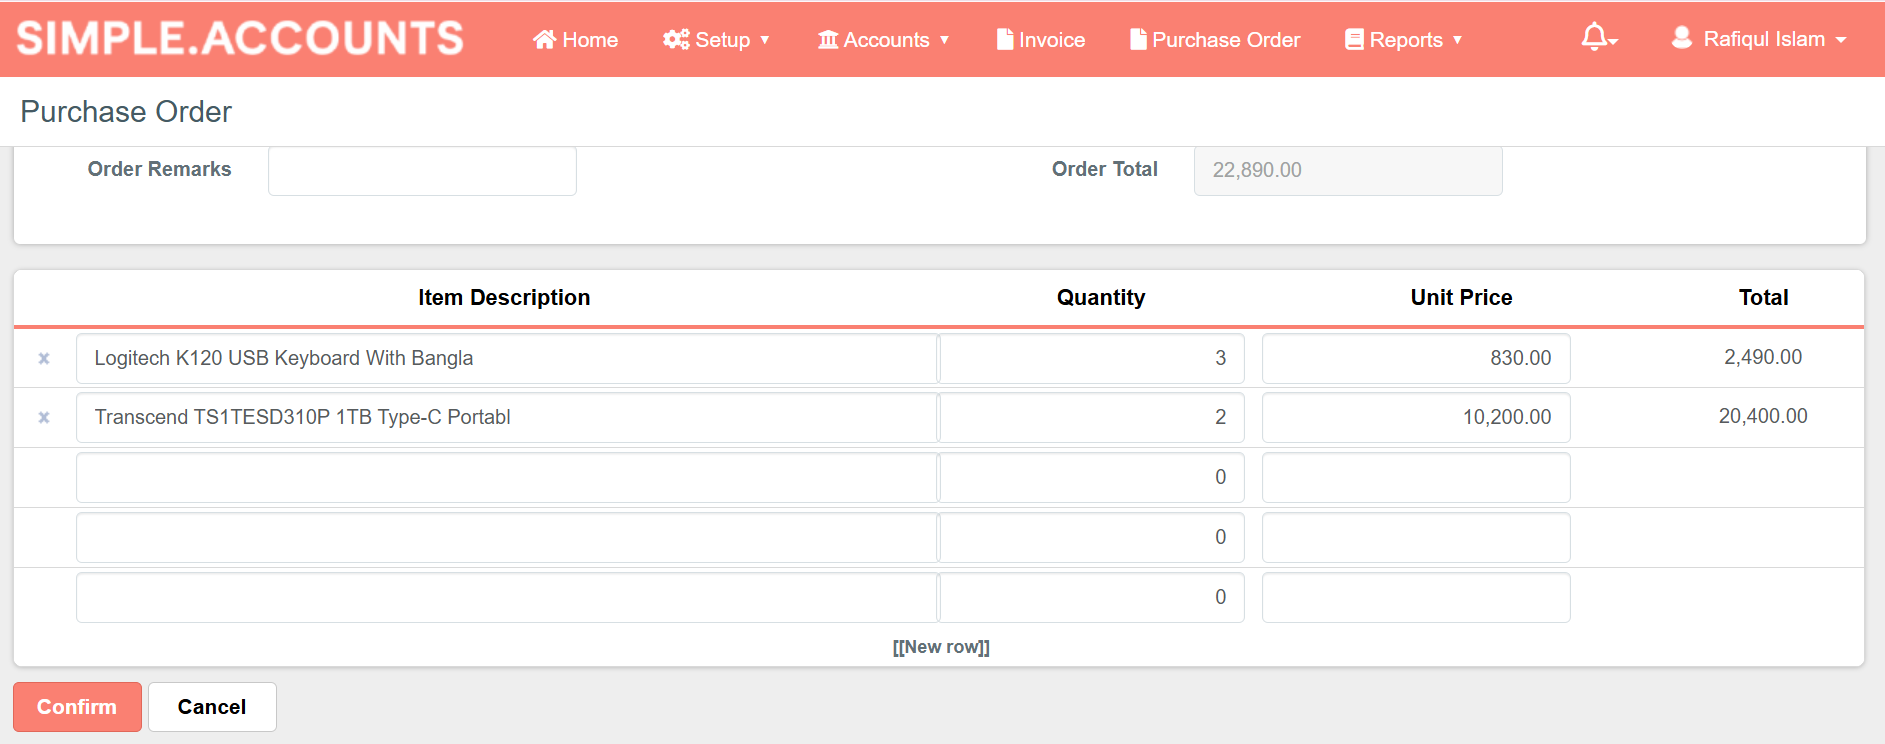
- Press the ‘Confirm’ button.
3.4. Create Expense
The Expense feature allows to record and manage all business expenses in the system. It helps track payments made for various expense categories, such as rent, utilities, salaries, travel, or supplies, ensuring accurate financial reporting and expense control.
Accounts → Expense
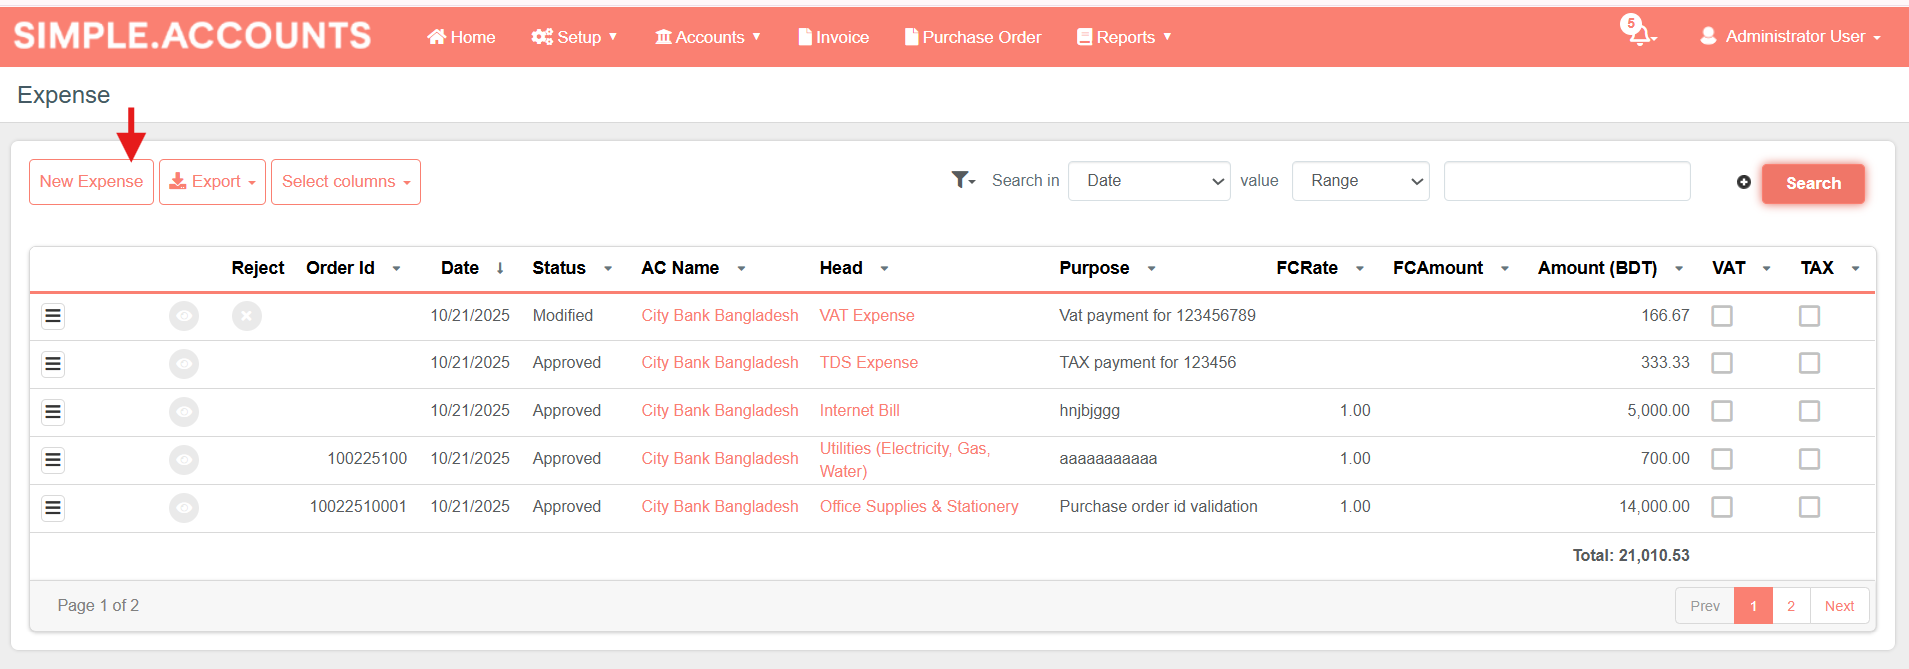
Create New Expense
- Go to ‘New Income’
- Enter General Information (Date, Purpose, Amount, etc)
- Select the Purchase Order if the expense is related to any purchase order. You can select only the Approved Purchase order. 3.3. Create Purchase Order
- Mark if the Vat or Tax is Inclusive.
- You can upload any supporting documents related to the expense.
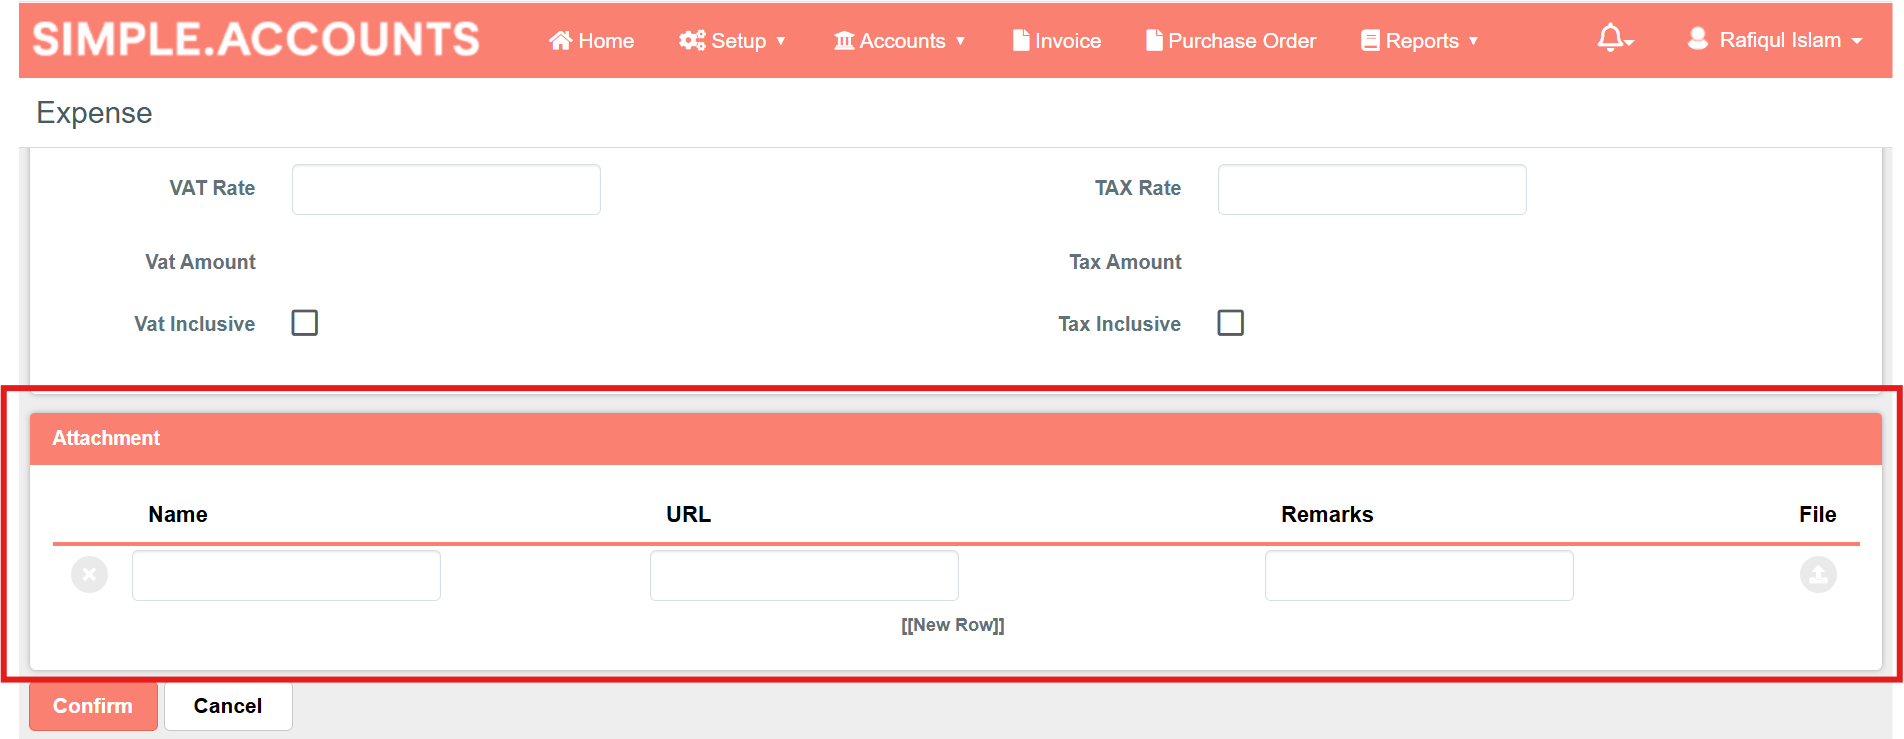
- Press the ‘Confirm’ button.
3.5. Account Transfer
The Account Transfer feature allows the transfer funds between two accounts within the system. This is useful for recording internal movements of money — such as transferring funds from a bank account to a cash account, or between different bank accounts — without affecting income or expense records.
Accounts → Account Transfer
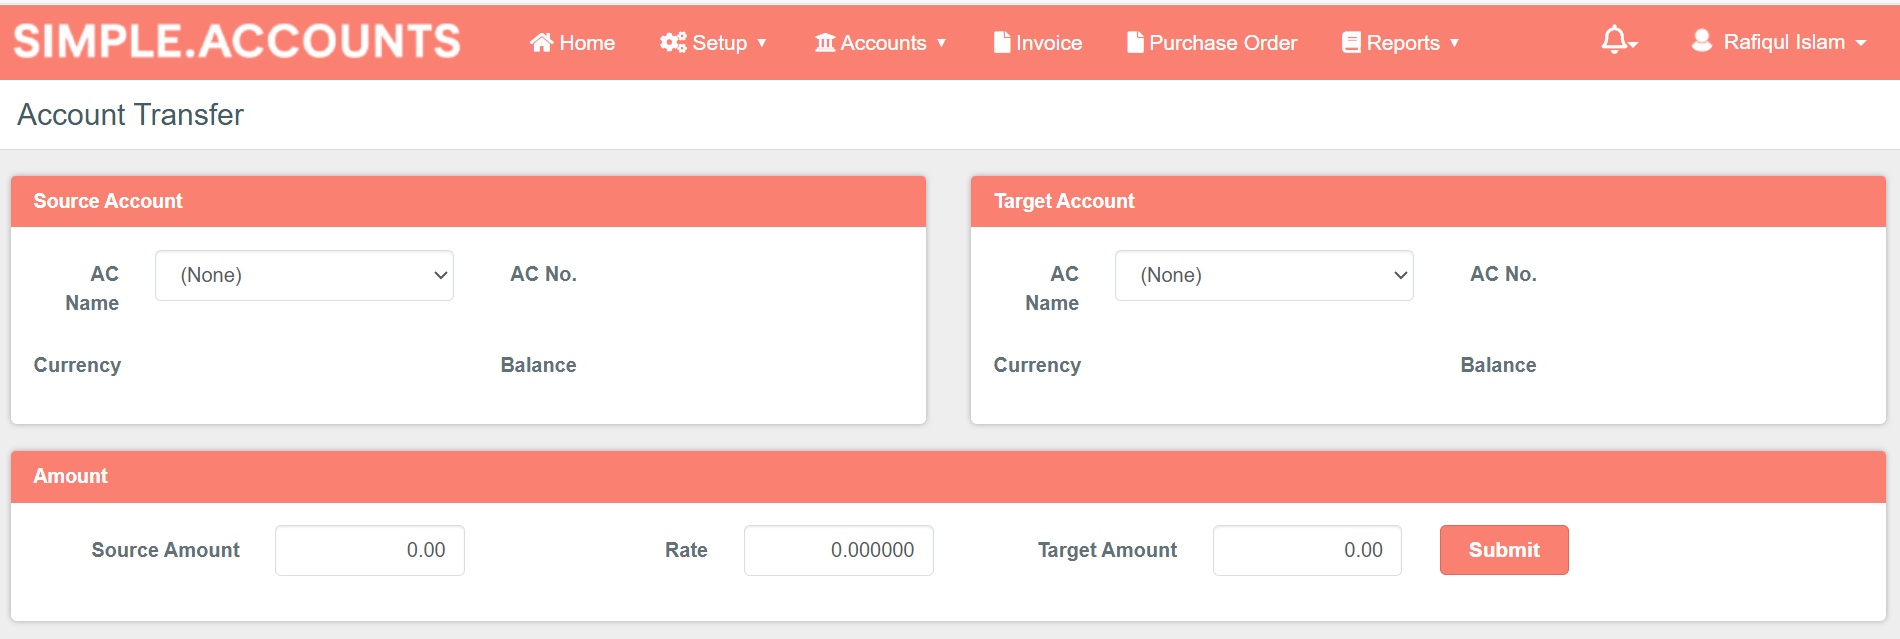
Transfer fund
- Select Source Account.
- Select Target Account.
- Enter the Source Amount.
- Enter Exchange Rate.
- Press the ‘Confirm’ button.
3.6. VAT Registration
The VAT Registration feature manages Value Added Tax (VAT) records automatically within the system. Whenever an income or expense transaction is recorded, the system automatically creates a corresponding VAT record based on the applicable vat rate. This ensures accurate vat tracking and simplifies VAT reporting for compliance purposes.
How to Pay
- Select the Items you want to pay.
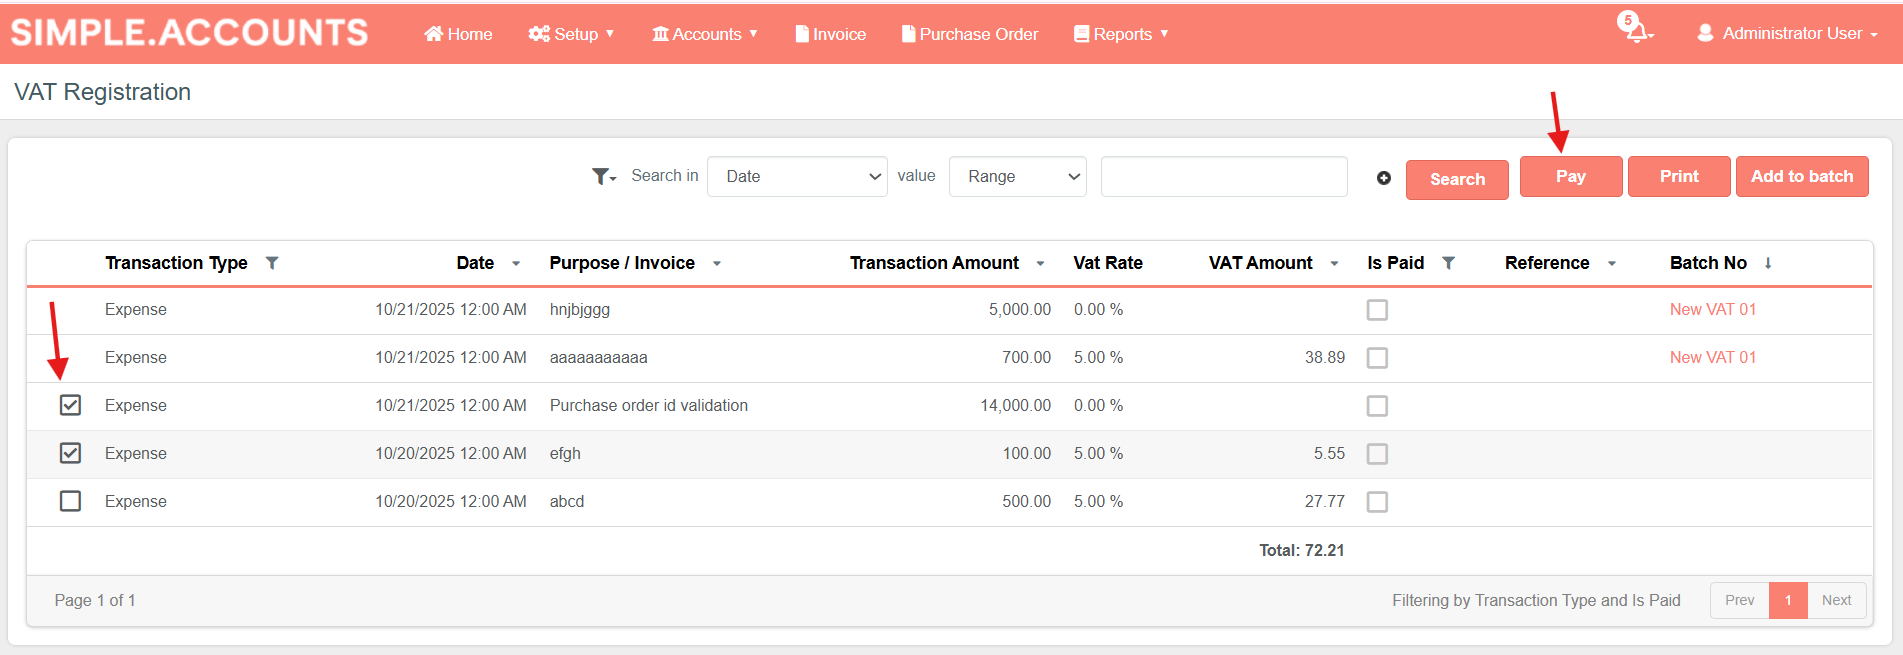
- Press the ‘Pay’ button.
- Enter Payment Date
- Select the account to pay from.
- Enter reference.
- You can upload any supporting attachment.
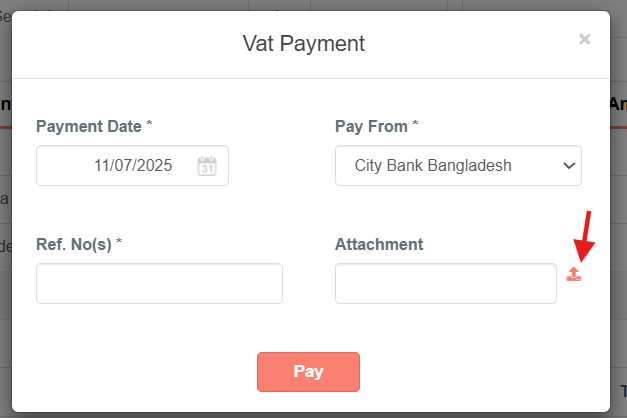
- Press the ‘Pay’ button.
How to Print
You can print Unpaid items and the items that are not added to any Batch.
- Select the items you want to print.
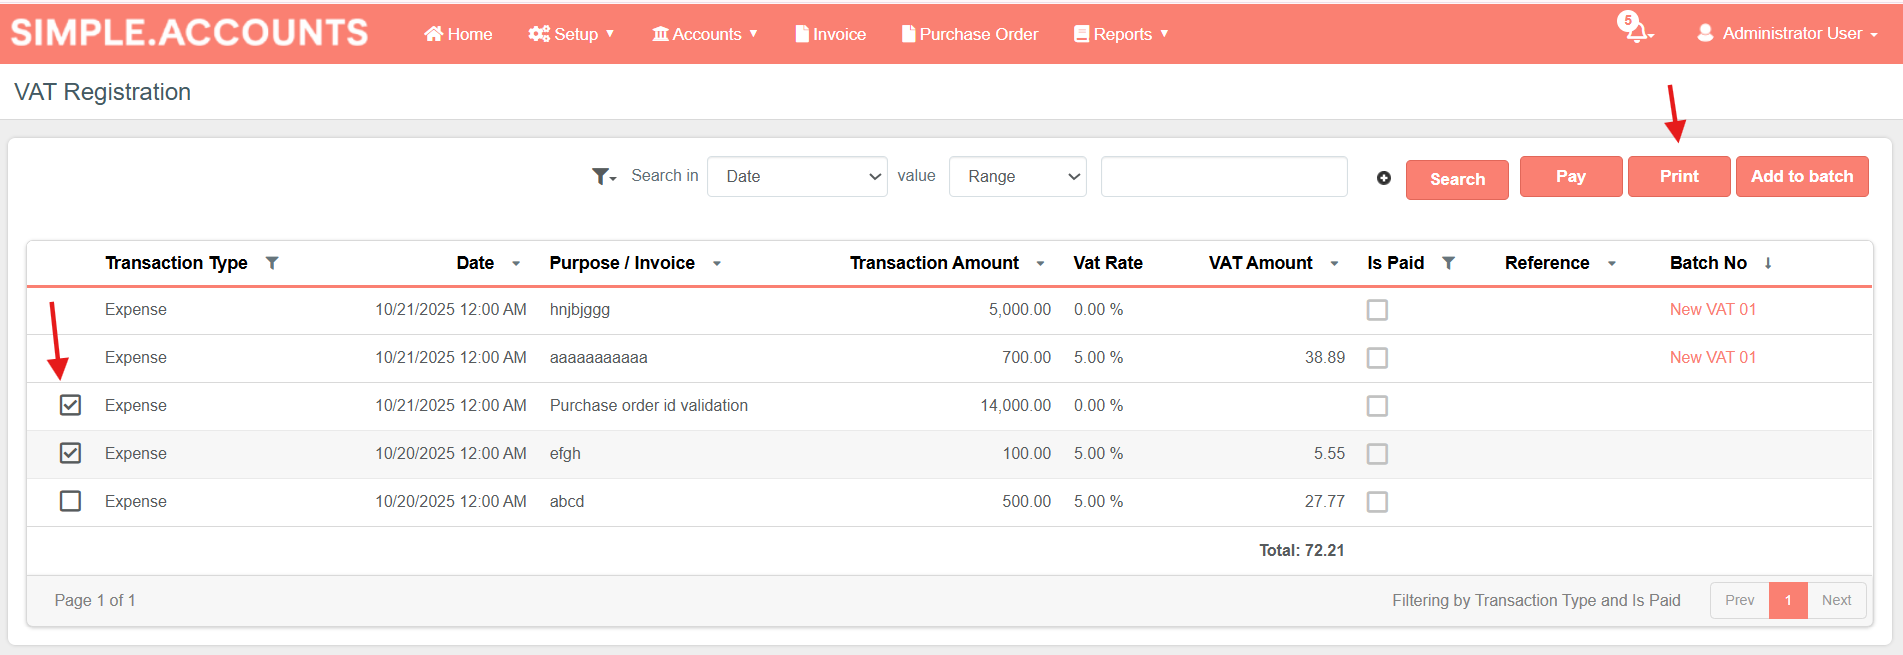
- Press the ‘Print’ button.
How to Add to a Batch
- Select the items you want to add to a batch.
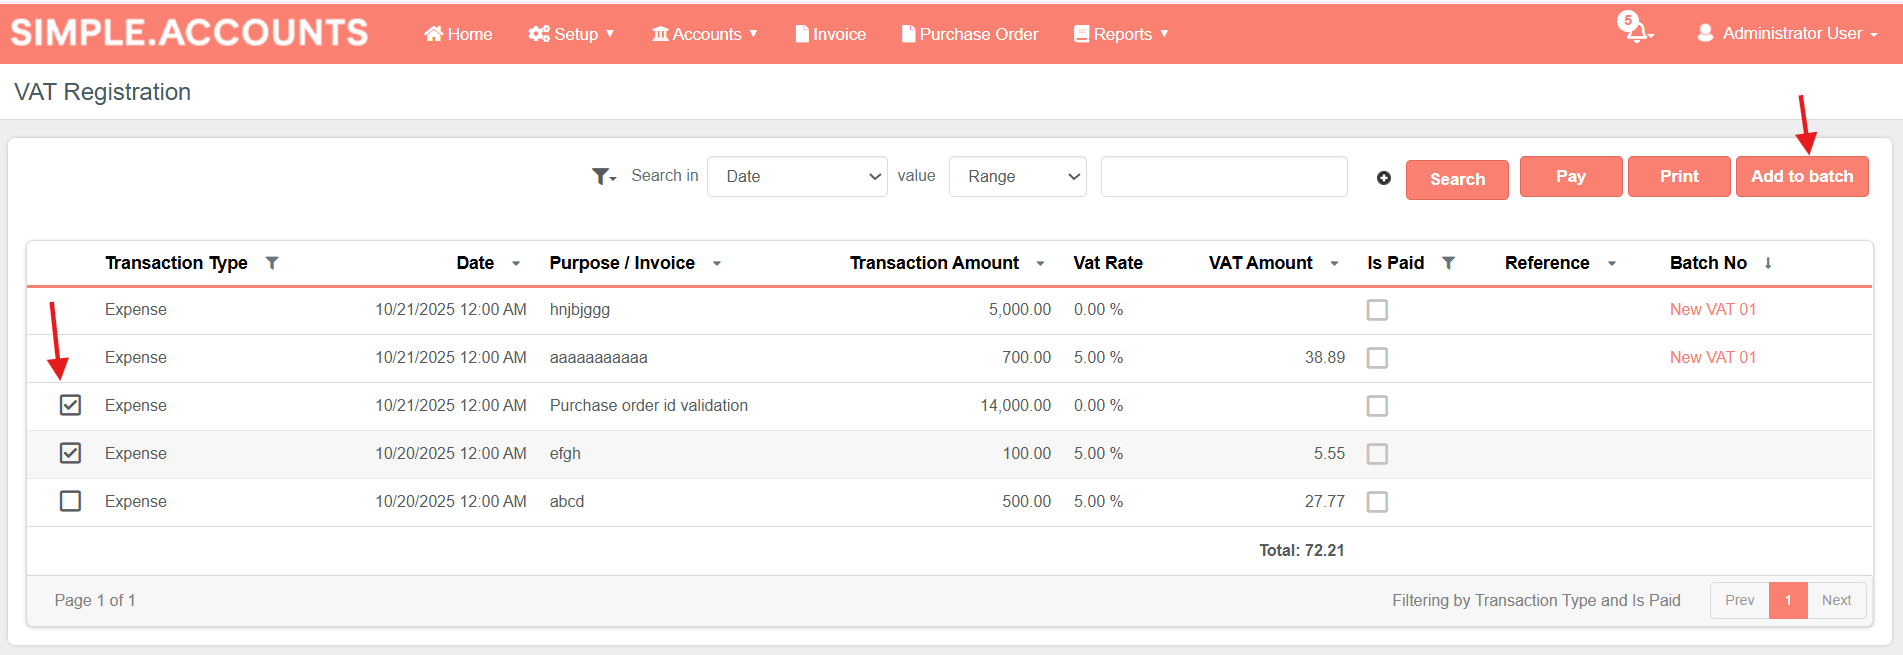
- Press the “Add to batch’ button.
- Select the Batch where you want to add. 2.9. Create Batch Process
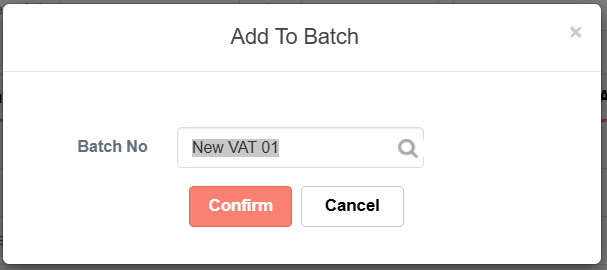
- Press the ‘Confirm’ button.
3.7. TDS Registration
The TDS Registration feature manages Tax Deducted at Source (TDS) records automatically within the system. Whenever an income or expense transaction is recorded, the system automatically creates a corresponding TDS record based on the applicable tax rate. This ensures accurate tax tracking and simplifies TDS reporting for compliance purposes.
How to Pay
- Select the Items you want to pay.
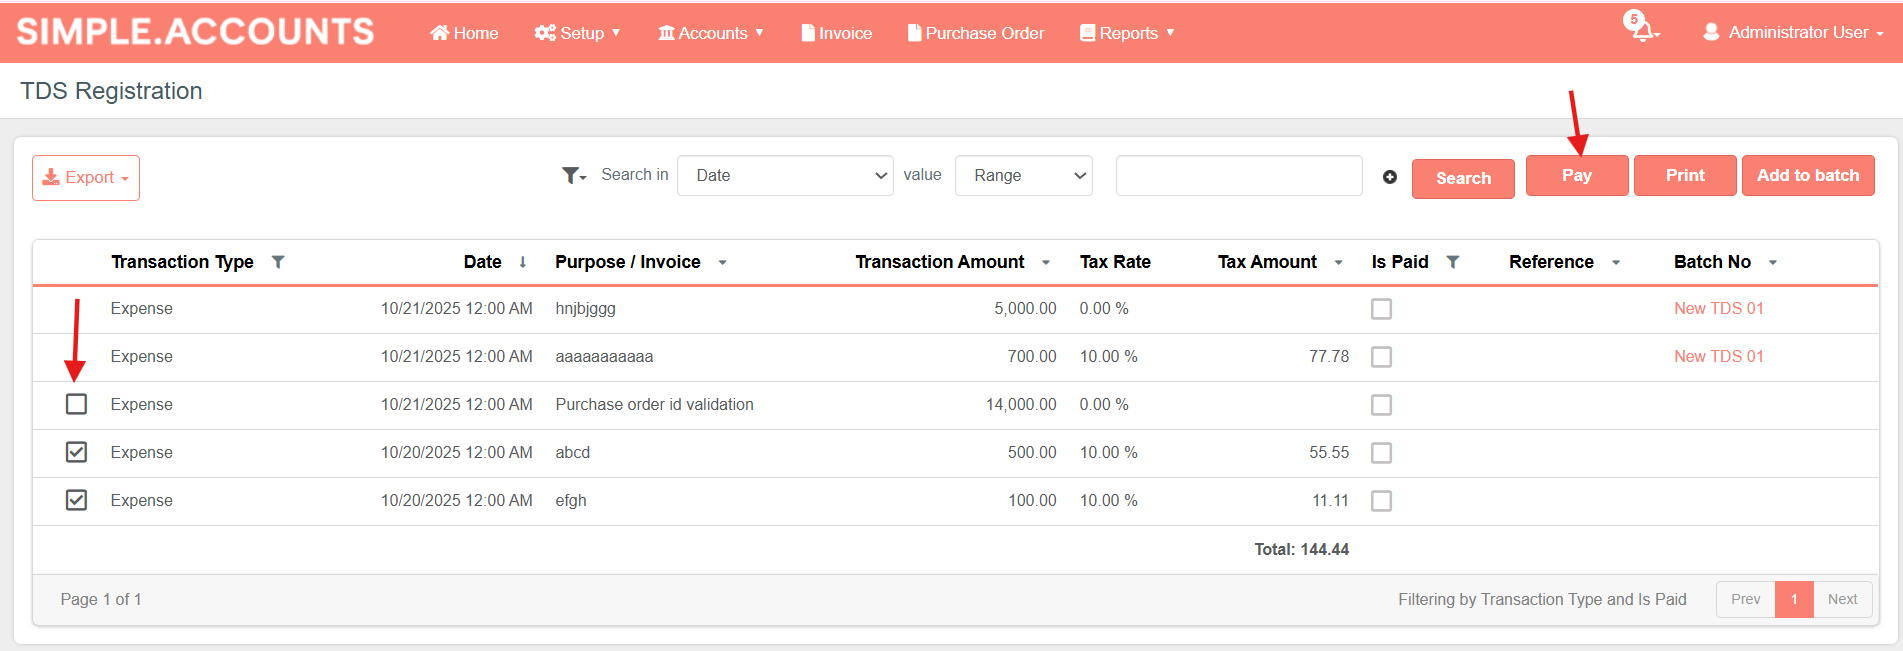
- Press the ‘Pay’ button.
- Enter Payment Date
- Select the account to pay from.
- Enter reference.
- You can upload any supporting attachment.
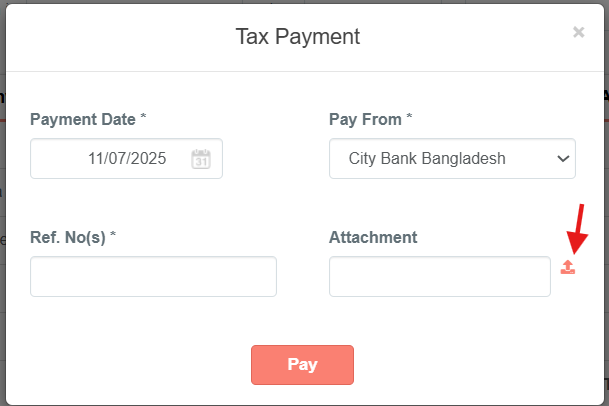
- Press the ‘Pay’ button.
How to Print
You can print Unpaid items and the items that are not added to any Batch.
- Select the items you want to print.
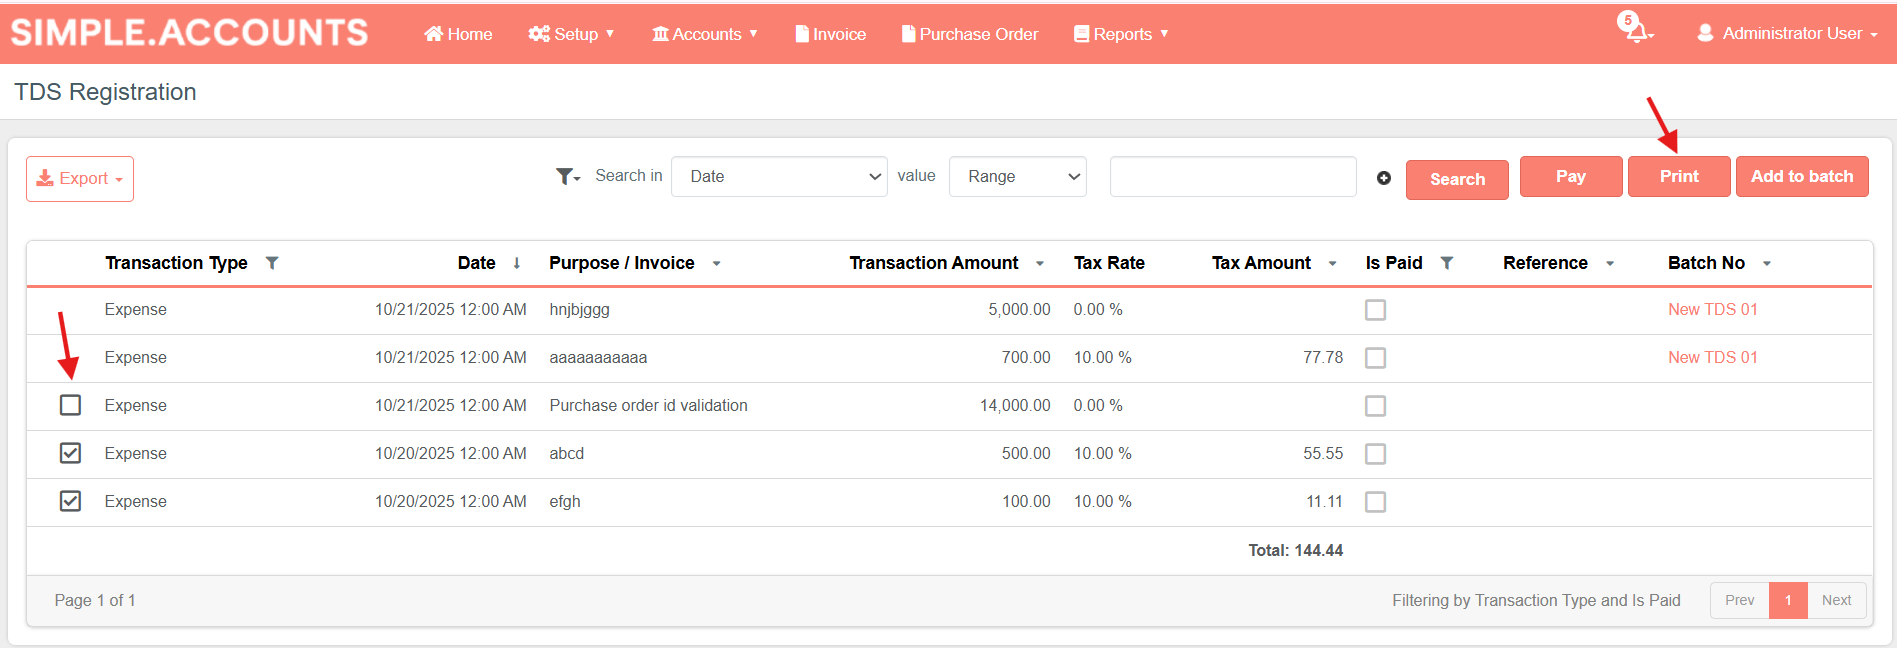
- Press the ‘Print’ button.
How to Add to a Batch
- Select the items you want to add to a batch.
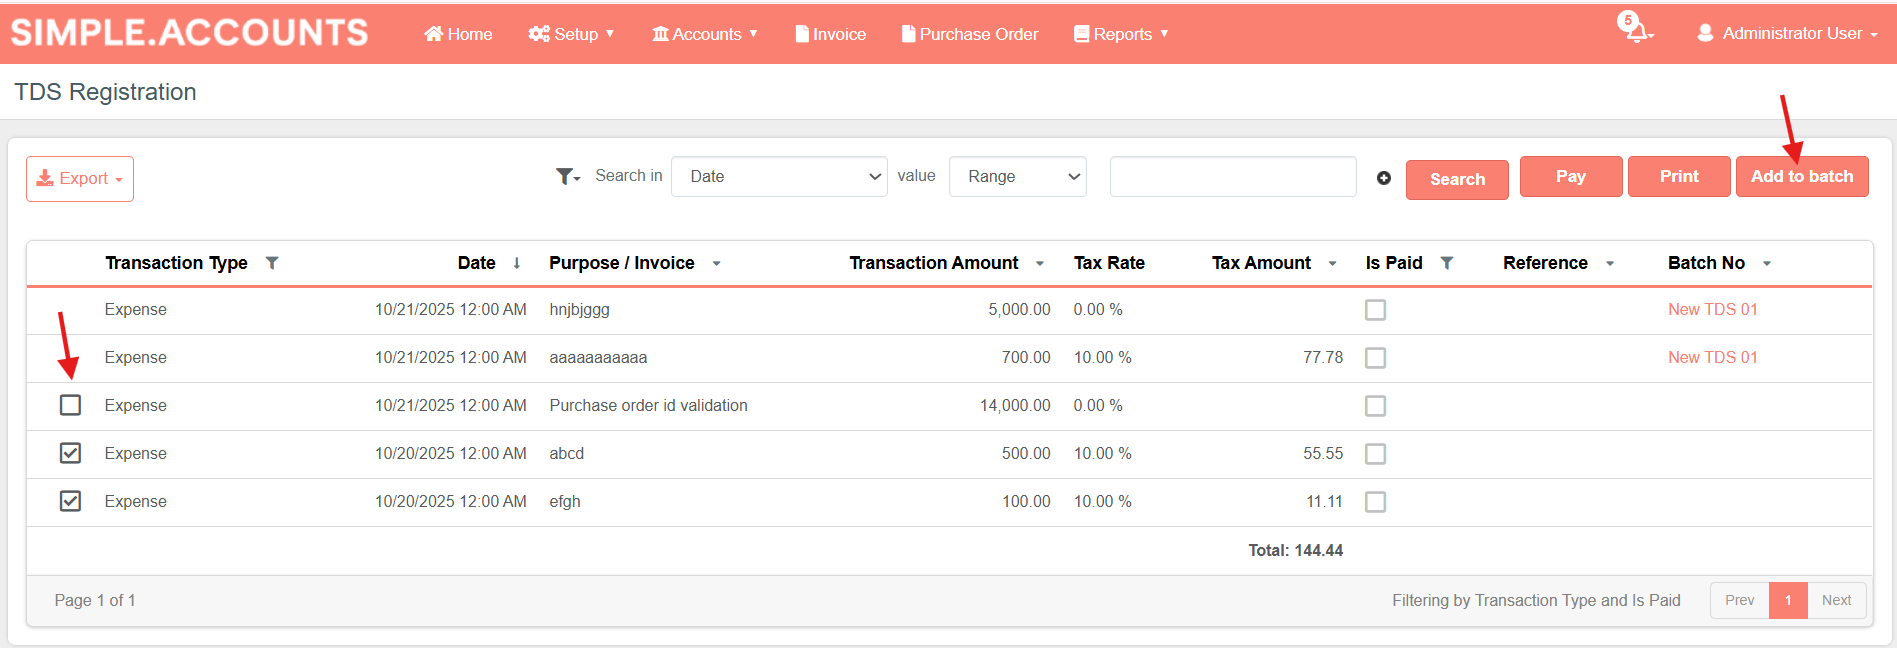
- Press the “Add to batch’ button.
- Select the Batch where you want to add. 2.9. Create Batch Process
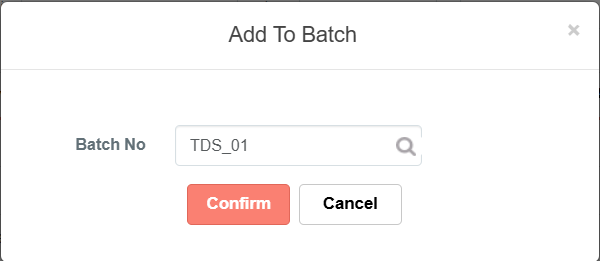
- Press the ‘Confirm’ button.
3.8. Batch Process
The Batch Process feature allows us to pay multiple VAT or Tax records at once as a single grouped transaction. This helps streamline payment processing and ensures that multiple tax liabilities can be cleared efficiently using the same payment reference. 2.9. Create Batch Process
How to Pay
Accounts → Batch Process
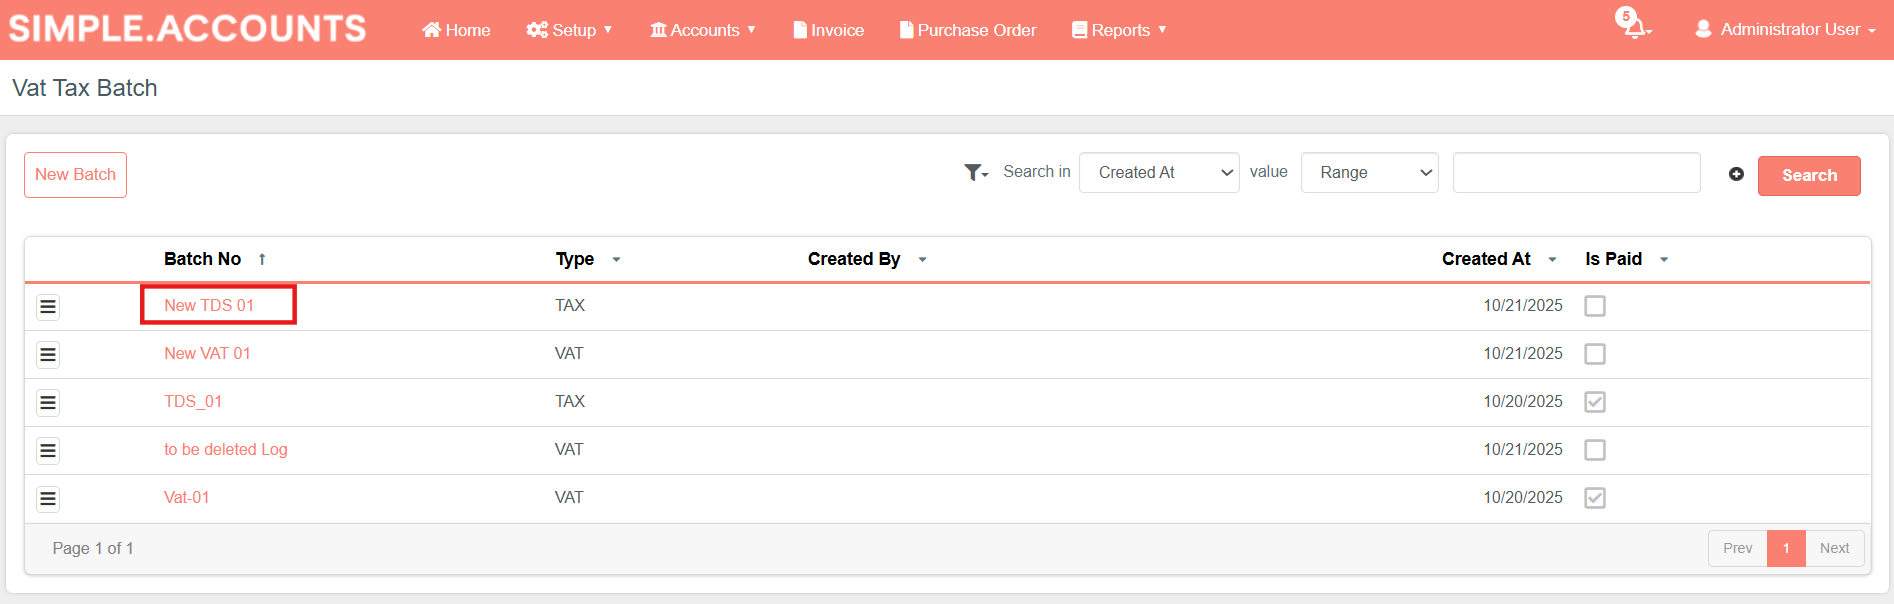
- Go to the Batch you want to pay.
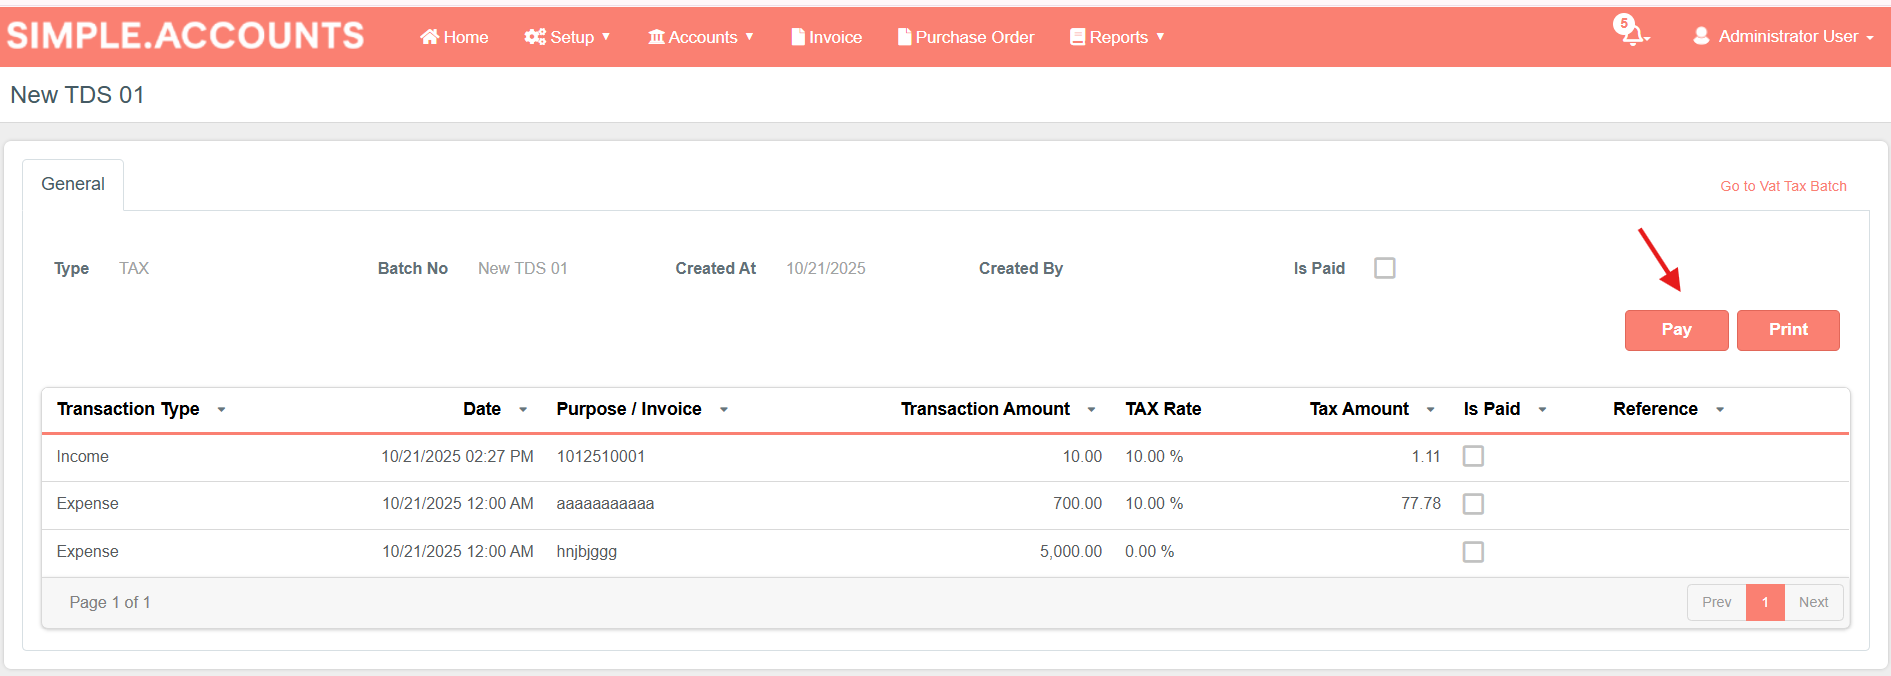
- Press the ‘Pay’ button
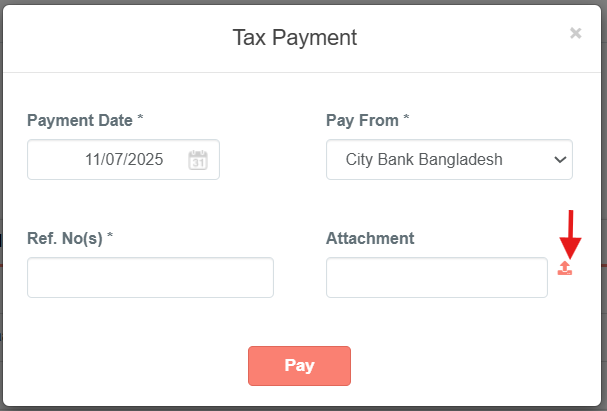
- Enter the required information.
- Press the ‘Pay’ button
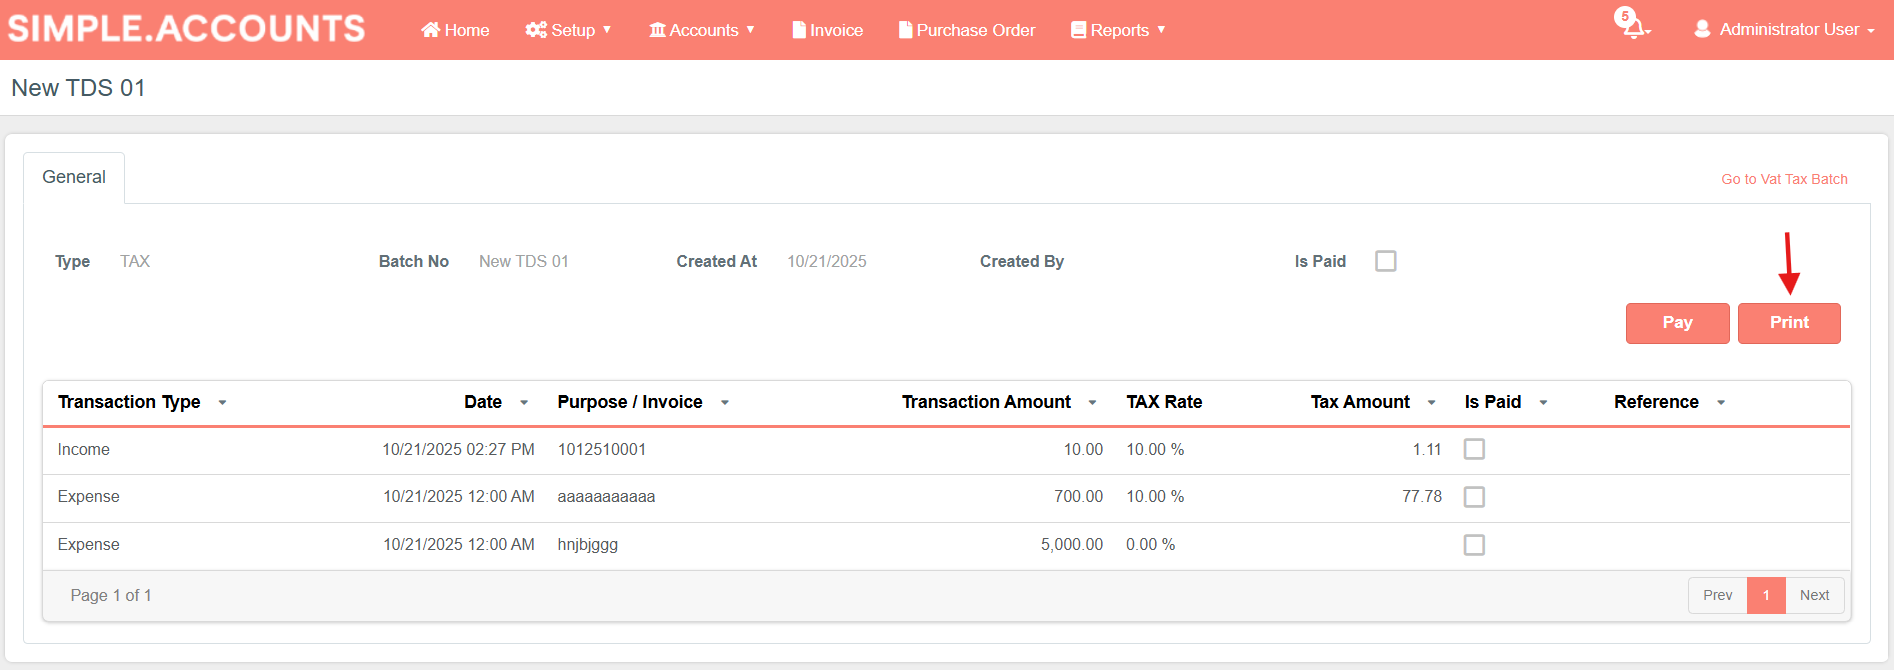
Note: Press the ‘Print’ button to print the items in the Batch.
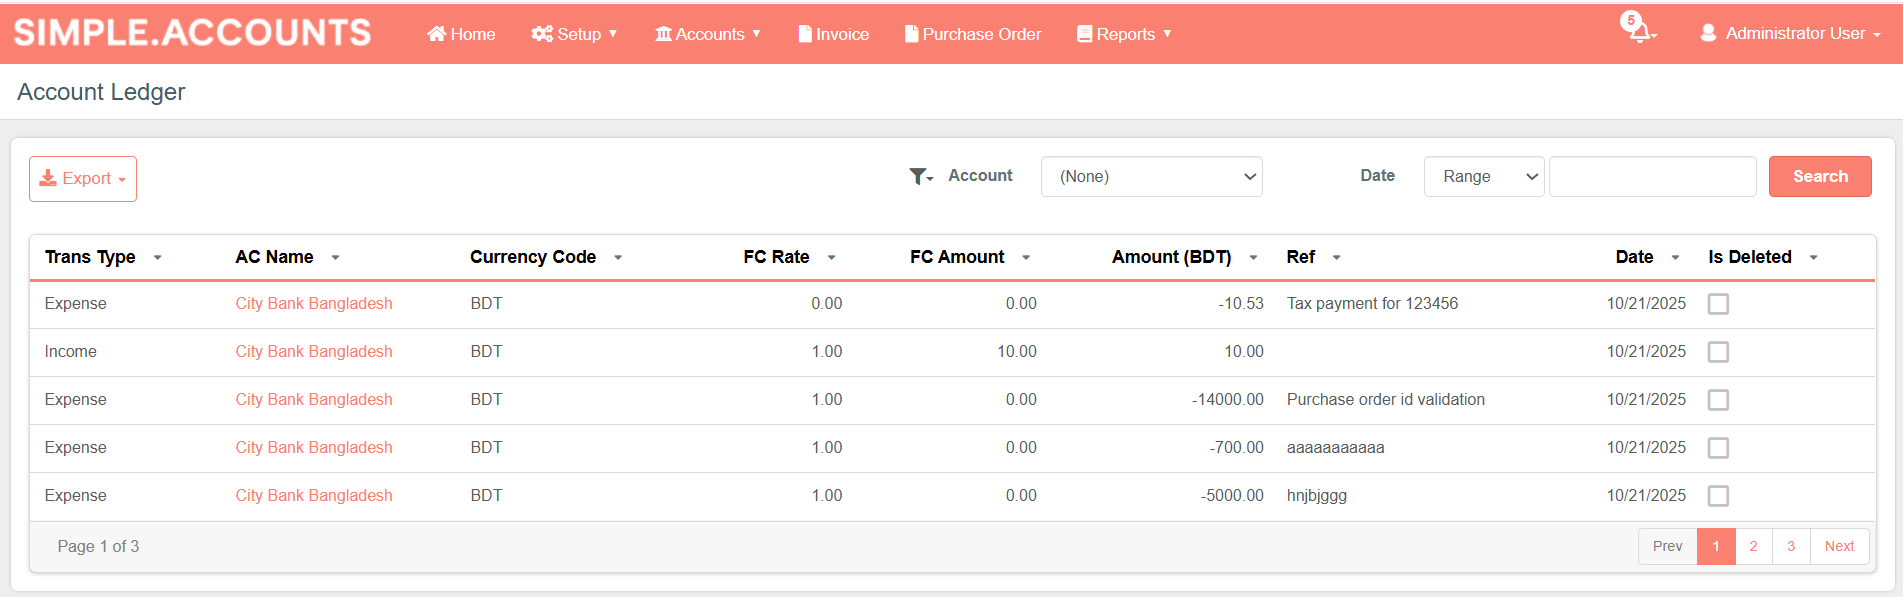
3.9. Account Ledger
The Account Ledger feature allows users to view and track all financial transactions related. Every transaction recorded in the system — such as Income , Expense , Account Transfer — automatically updates the related account ledgers.
Accounts → Account Ledger
4. Reports
The Reports feature provides users with a comprehensive overview of all financial activities recorded in the system. It allows users to generate, view, and export different types of reports such as income statement, account statement, etc. These reports help in monitoring business performa nce, ensuring transparency, and simplifying decision-making.
4.1. Account Statement
Reports → Account Statement
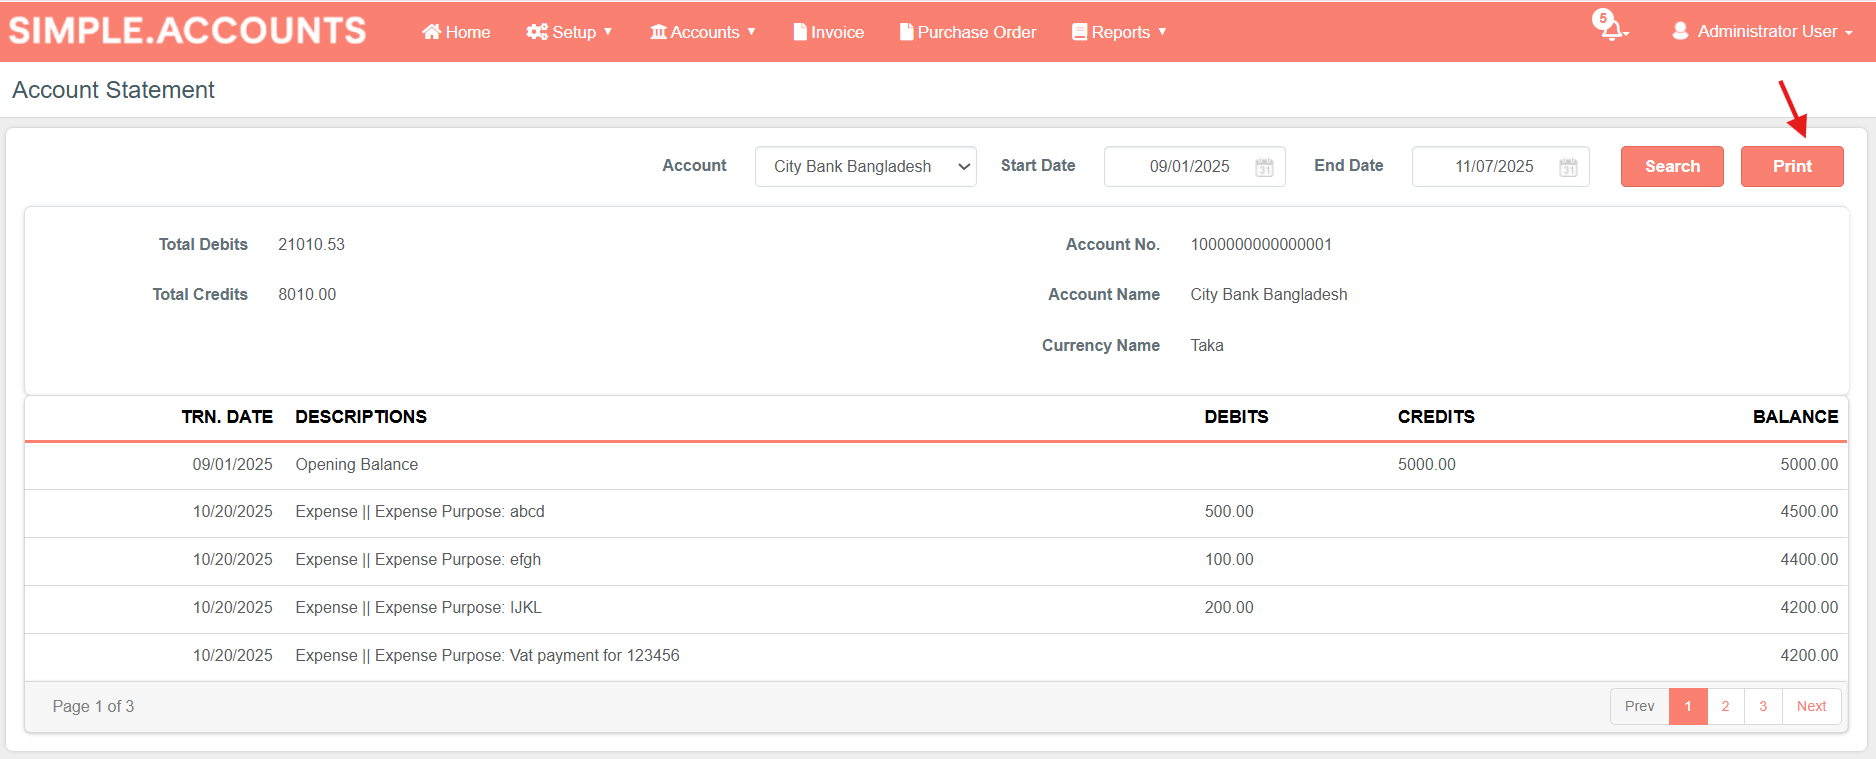
- Select the Account from the dropdown.
- Select Start date and end date.
- Press the ‘Search’ button to see the statement.
- Press the ‘Print’ button to print the statement.
4.2. Income Statement
Reports → Income Statement
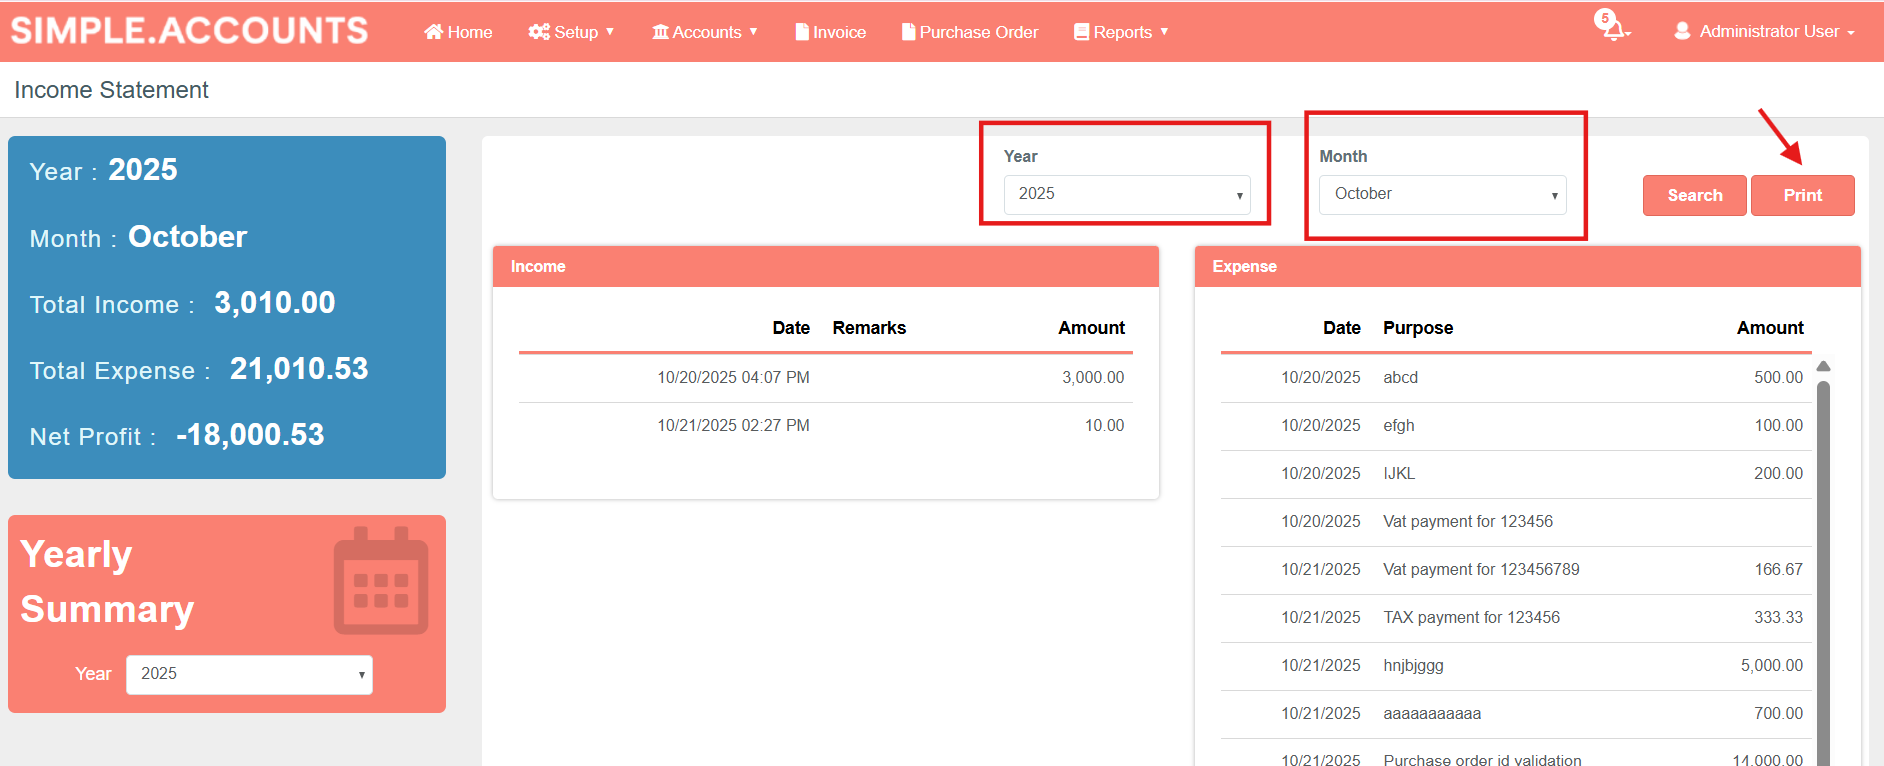
- Select the Year.
- Select the Month.
- Press the ‘Search’ button to see the statement.
- On the top left side of the screen you can see the summary of the statement.
- Press the ‘Print’ button to print the statement.
Yearly Summary
Reports → Income Statement
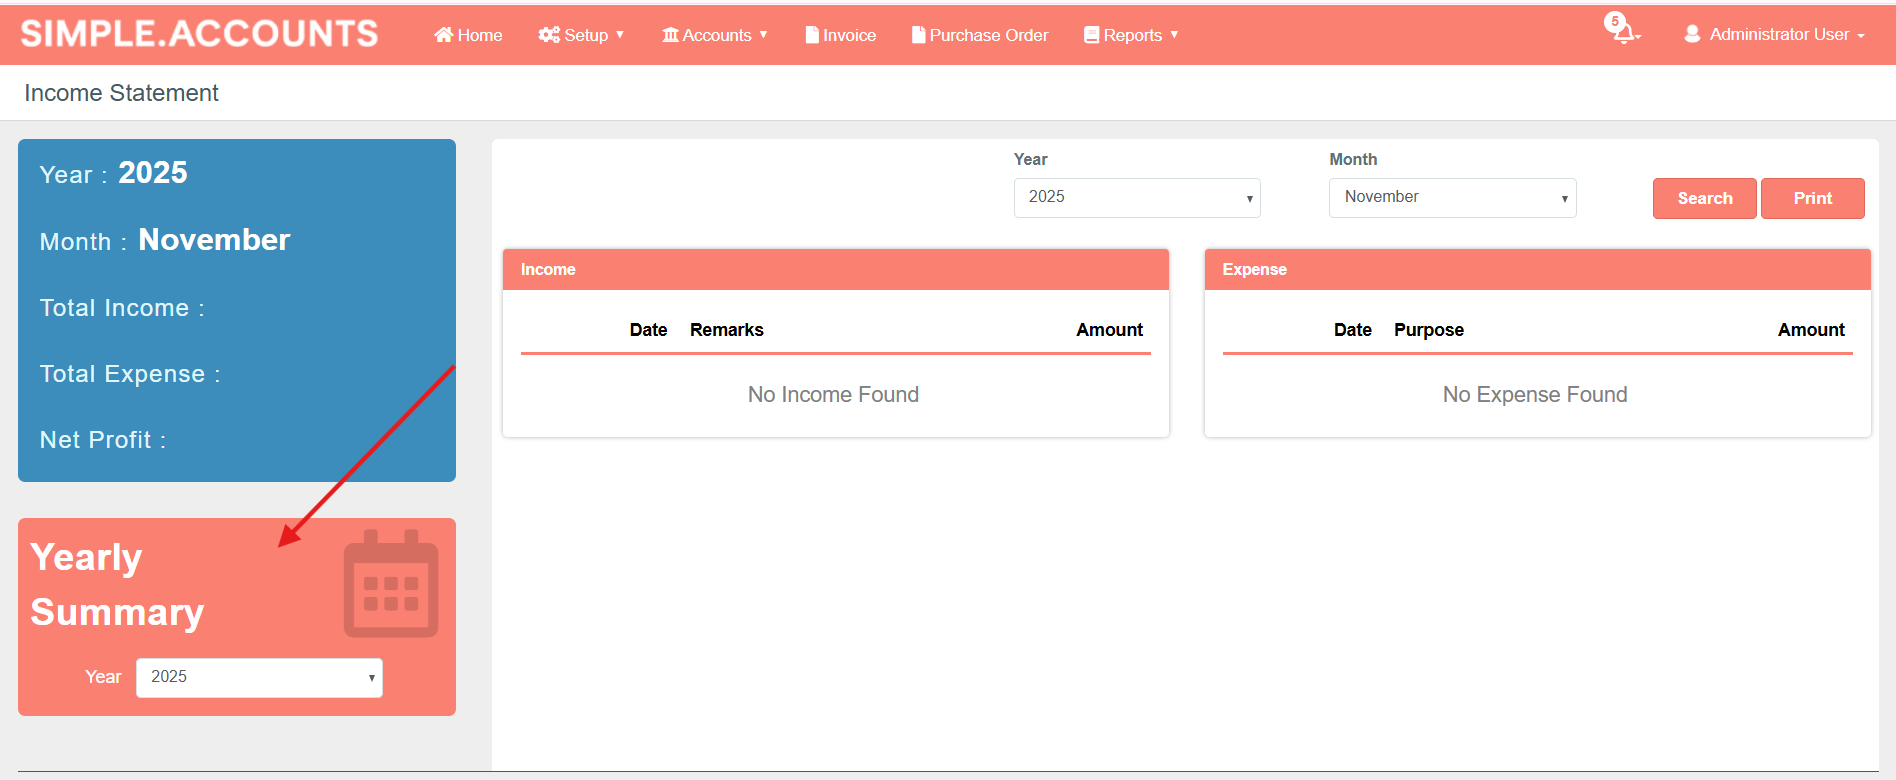
- Select the Year in the ‘Yearly Summary’ card.
- Click on the ‘Yearly Summary’ card to see the yearly summary.